Documentation
Case Management
CYBERQUEST provides a case management module designed to help organizations and users to create and track workflows in order to quickly address incidents.…
CYBERQUEST provides a case management module designed to help organizations and users to create and track workflows in order to quickly address incidents. Every case created has an owner which can assign collaborators to enhance the decision-making process and streamline the case resolution. The case allows adding of all existing evidence based on the event or alert that led to creation of the case.
Overview
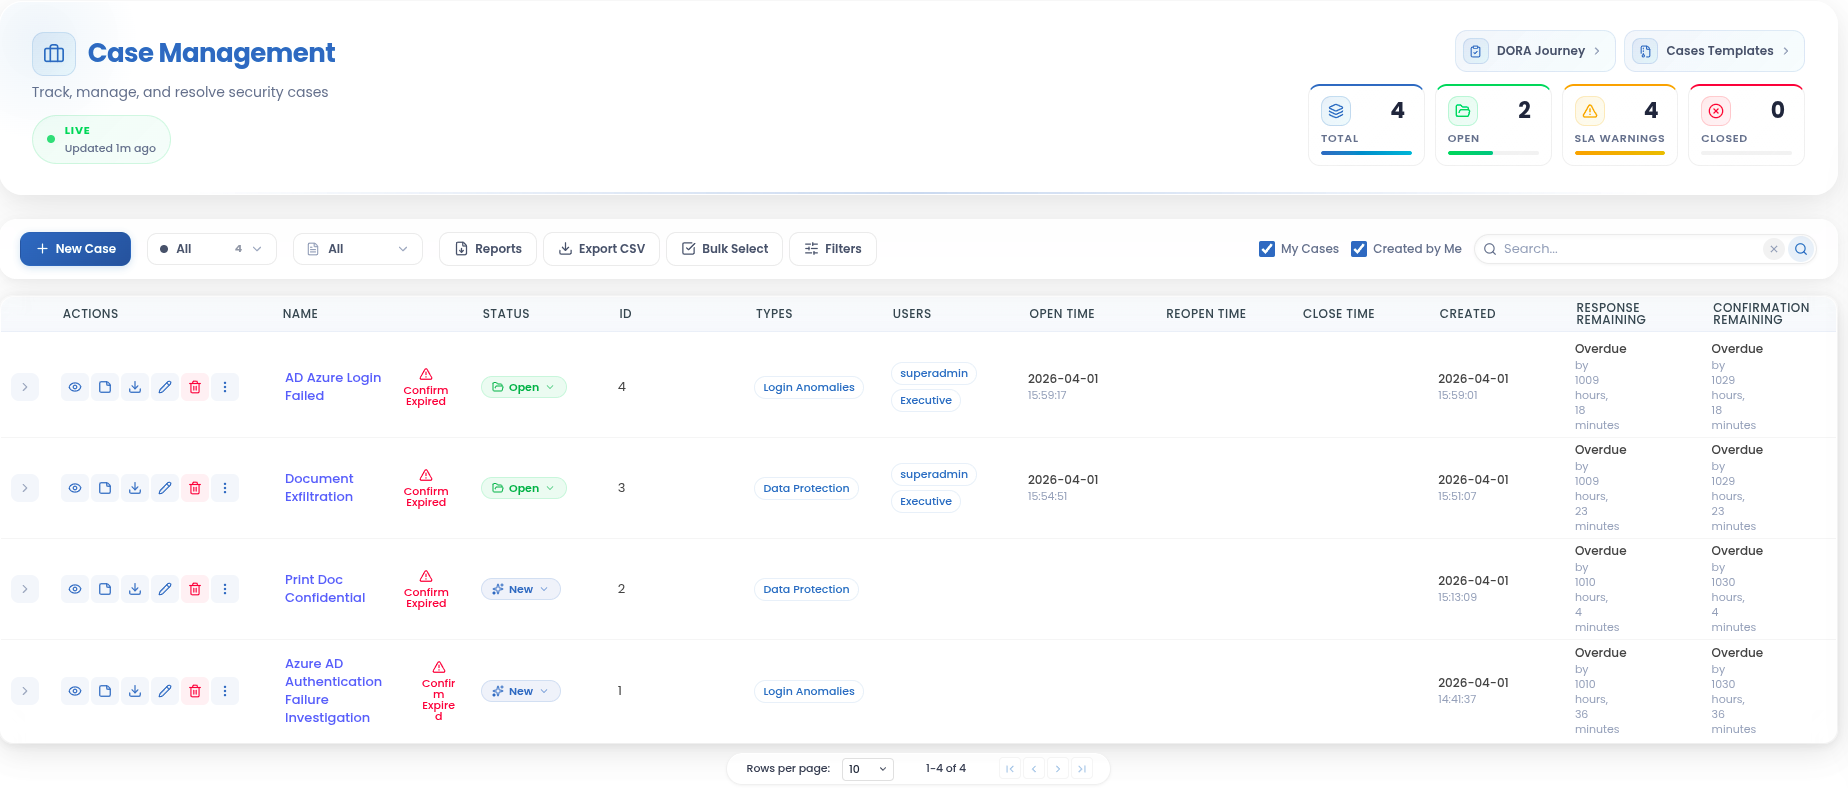
The Case Management module can be accessed by selecting “Case Management” button, in the left-side menu in Web Interface. The main interface presents a comprehensive view of all cases, offering intuitive controls for filtering, searching, and managing investigations.
Users are presented with Case Management > My Cases page allowing the managing of existing cases and opening new ones, as needed:
To initiate a new investigation, click the NEW CASE button.
To display all cases where the currently authenticated user is the owner, select the My Cases switch.
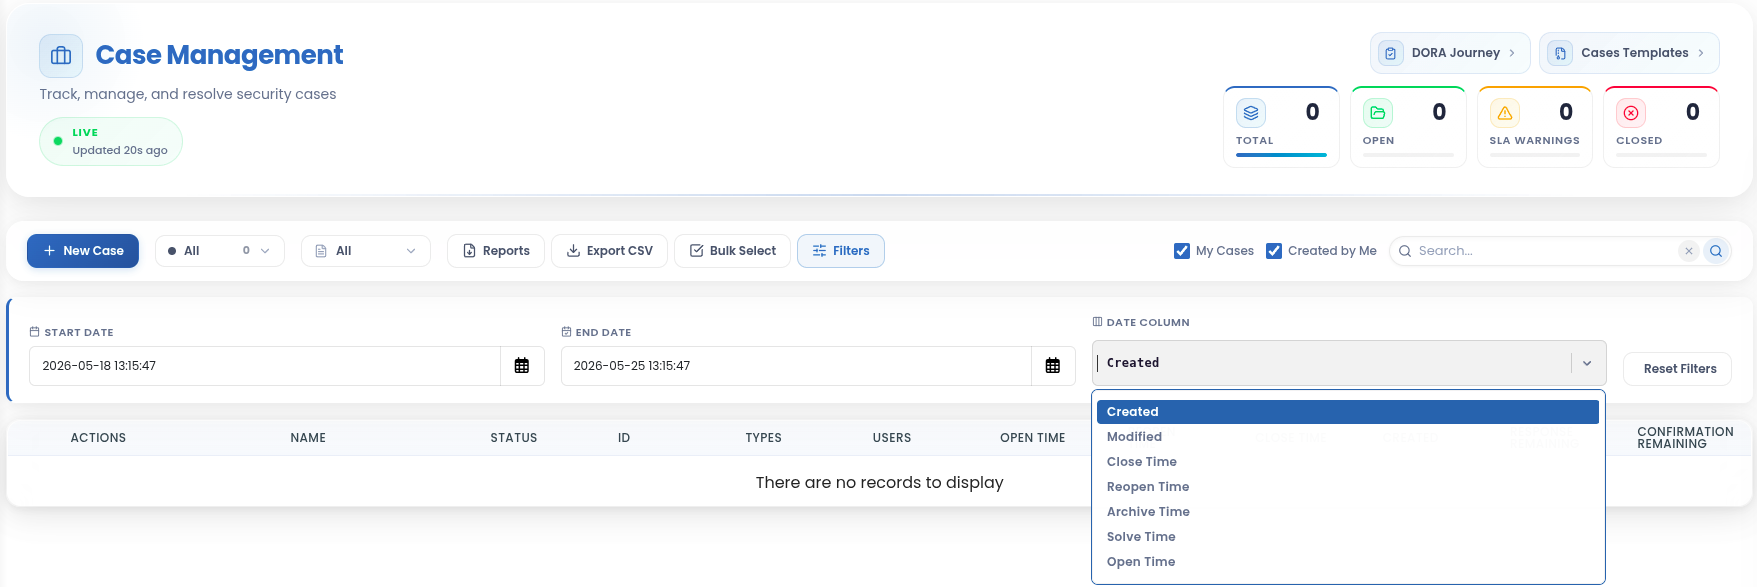
To filter cases based on their status, use the Status drop-down menu. The available options include:
- All: Displays every case in the system, regardless of its current status.
- New: Shows recently created cases awaiting initial triage and assignment.
- Open: Lists active investigations currently being worked on by the security team.
- Solved - Displays cases marked as solved.
Closed - Lists cases that have been finalized and closed.
Archived - Shows cases that have been archived for record-keeping or future reference.
Template - A drop-down list that allows selection of a predefined case template. These templates are created and managed in the Case Templates section and are used to streamline case creation
To locate a specific case, use the Quick Filter search box available on the right side of the web interface.
All cases are displayed in chronological order, with the most recently created cases appearing at the top of the list.
In the case list, the Actions menu is located on the right side and provides options to view, export, edit, or delete a case.
 To remove a case, click the
 ![]() button located in the top-right corner of the Case Management interface.
button located in the top-right corner of the Case Management interface.
To modify a selected case, click the ![]() button in the same area.
button in the same area.
Use the![]() button to export case data.
button to export case data.
The Response Remaining / Confirm Remaining columns provide critical visibility into service level agreement (SLA) compliance, ensuring timely incident response and resolution. These metrics help security teams prioritize cases and meet regulatory requirements.
- Response Due Time: Indicates the deadline for initial case acknowledgment and assignment. This is the time by which the security team must acknowledge the case and begin initial investigation.
- Confirmation Due Time: Represents the deadline for confirming the resolution of the case. This is the time by which the security team must confirm that all necessary remediation steps have been taken and the incident is fully resolved.
- Response Remaining: Shows the time remaining until the Response Due Time is reached. If this time has passed, it indicates how much time has elapsed since the deadline was missed.
- Confirm Remaining: Shows the time remaining until the Confirmation Due Time is reached. If this time has passed, it indicates how much time has elapsed since the deadline was missed.
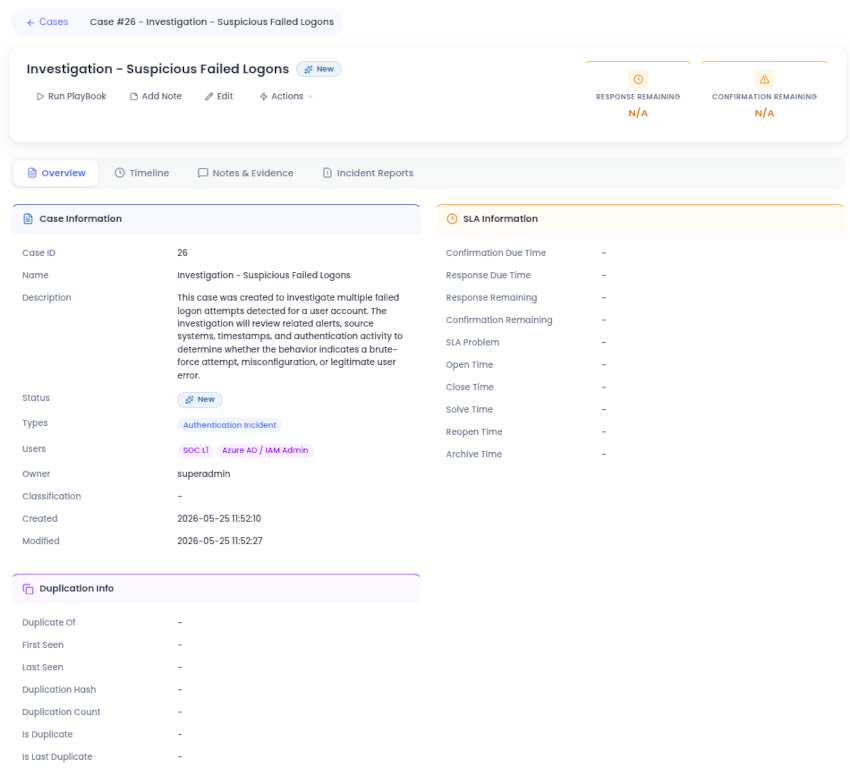
Detailed Case View
The Case Details View presents essential information and metadata related to a specific case. This includes general identifiers such as Case ID, name, type, and description, along with timestamps marking important lifecycle events - like when the case was created, modified, closed, or reopened.
It also provides SLA-related metrics such as Response Due Time, Confirmation Due Time, and their respective remaining or overdue durations. Ownership and access are indicated by fields like Case Owner, assigned users, and current Status.
Additional insights include duplication tracking (e.g., duplication hash and count), user classification, and whether the case is flagged as a duplicate or the most recent duplicate. These details support efficient case management, auditing, and prioritization.
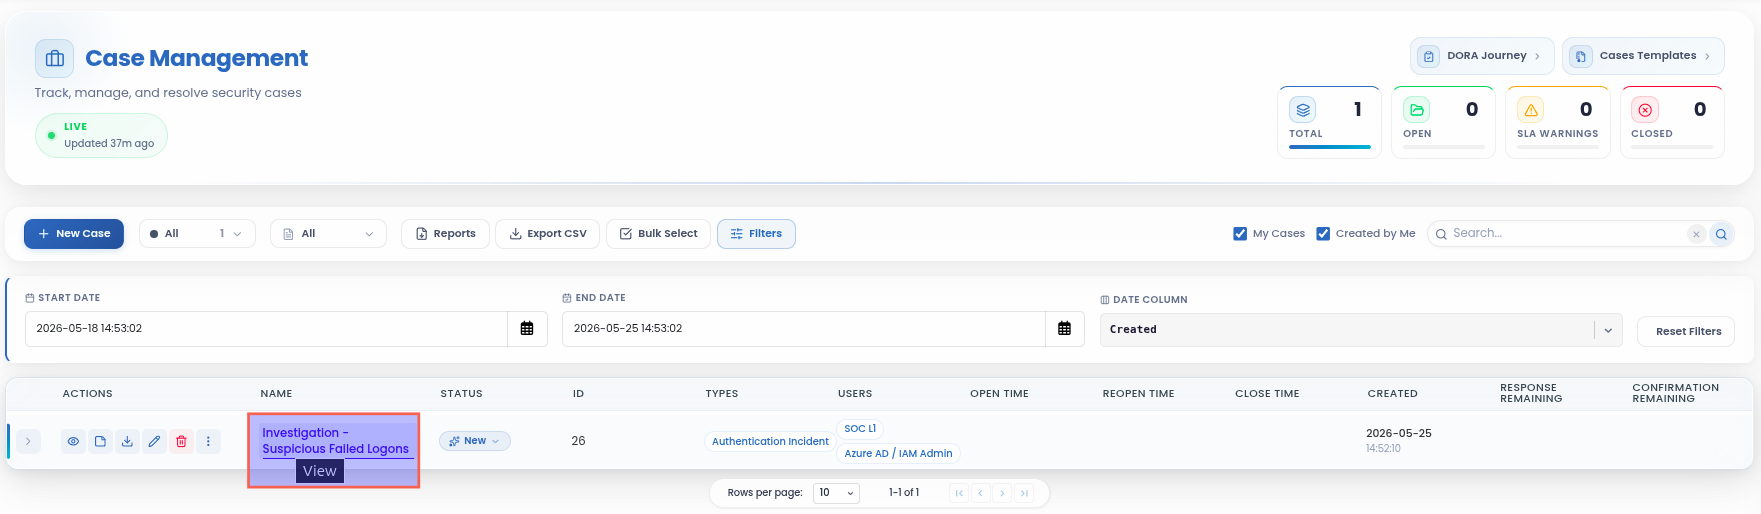
Click the ![]() button to open a quick view of a specific case. Alternatively, click the case name to access the case details:
button to open a quick view of a specific case. Alternatively, click the case name to access the case details:
The case details page is organized into several views:
Overview
The Overview tab displays the main information about the selected case, including case ID, name, description, status, type, assigned users, owner, creation date, and last modification date. It also includes SLA and duplication information, helping users quickly understand the current state and context of the case.
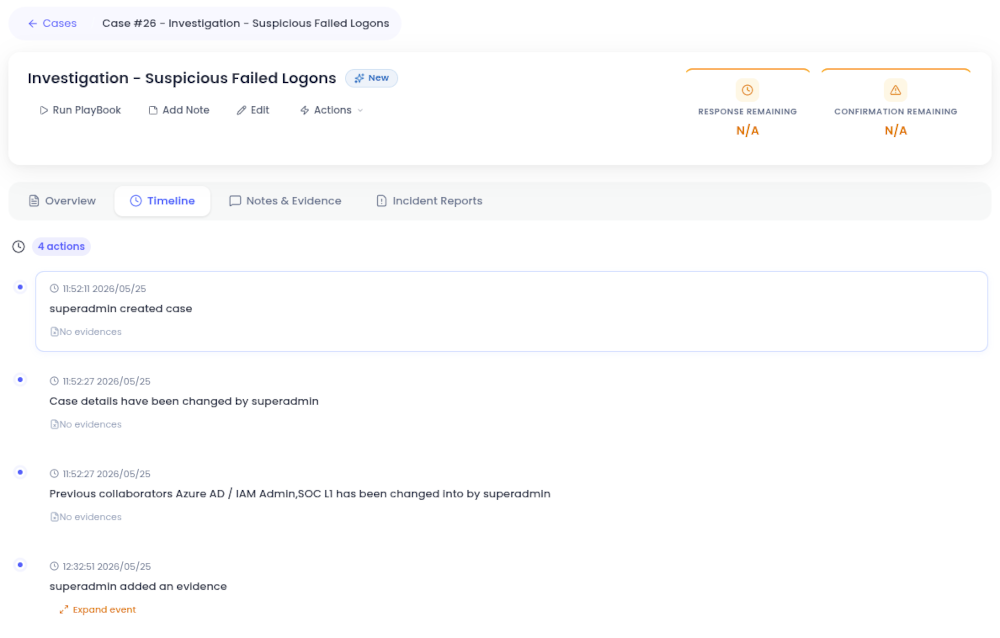
Timeline
The Timeline tab provides a chronological history of all actions performed on the case. It helps users track case activity, such as creation, updates, collaborator changes, and evidence additions.
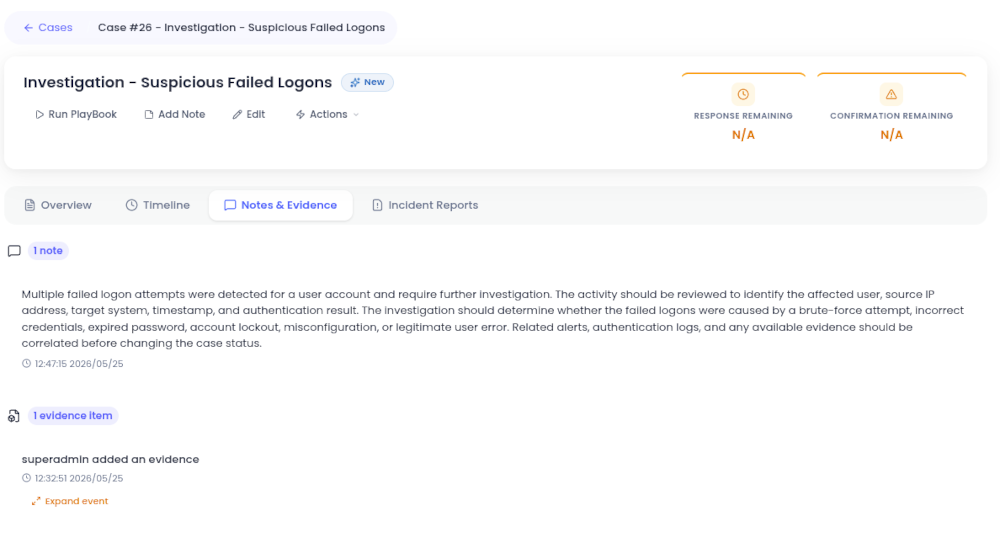
Notes & Evidence
The Notes & Evidence tab displays notes and evidence items associated with the case.
The Notes area shows comments or investigation notes added by users. If no notes are available, the interface displays a no-notes message.
The Evidence area lists uploaded or attached evidence items, such as logs, screenshots, exported alerts, or other supporting files. Evidence entries include the user who added the item and the timestamp. The user can expand the evidence entry to review additional information.
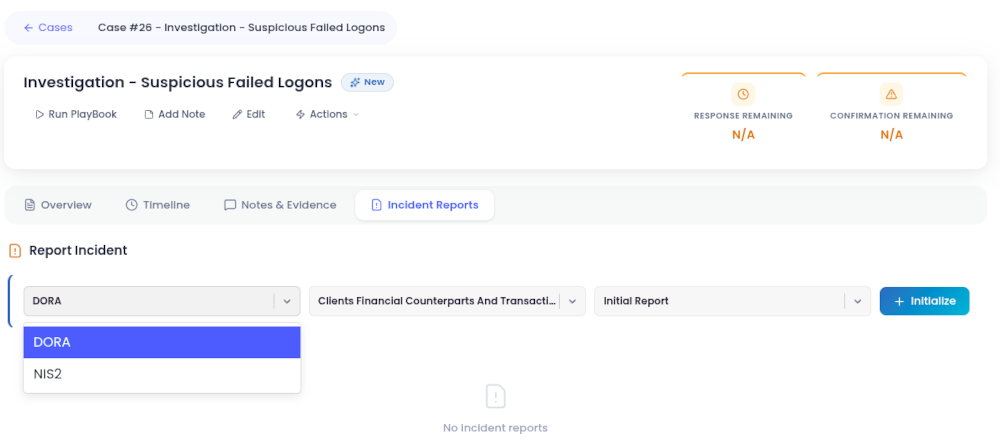
Incident Reports
The Incident Reports tab allows users to initialize and manage incident reports associated with the case.
From this view, the user can select the reporting framework, such as DORA or NIS2, choose the relevant incident report category, select the report type, and initialize the report.
This section is used to support regulatory reporting workflows by linking incident documentation directly to the investigation case. If no reports have been created, the interface displays a no incident reports message.
At the top of the page, available actions include running a playbook, adding a note, editing the case, and changing the case status.
Cases Manual Deduplication
Manual deduplication allows analysts to link cases that are determined to be related or identical based on their investigation. This process streamlines case management, reduces redundancy, and ensures that all relevant information is consolidated under the most appropriate case.
To start manual deduplication, click the ![]() button. From the actions menu, select Add Deduplicate Item.
button. From the actions menu, select Add Deduplicate Item.
After the case is added as a deduplication item, open the actions menu again and select Set Deduplicate Of. This option allows the user to choose the primary case that the current case will be linked to as a duplicate. 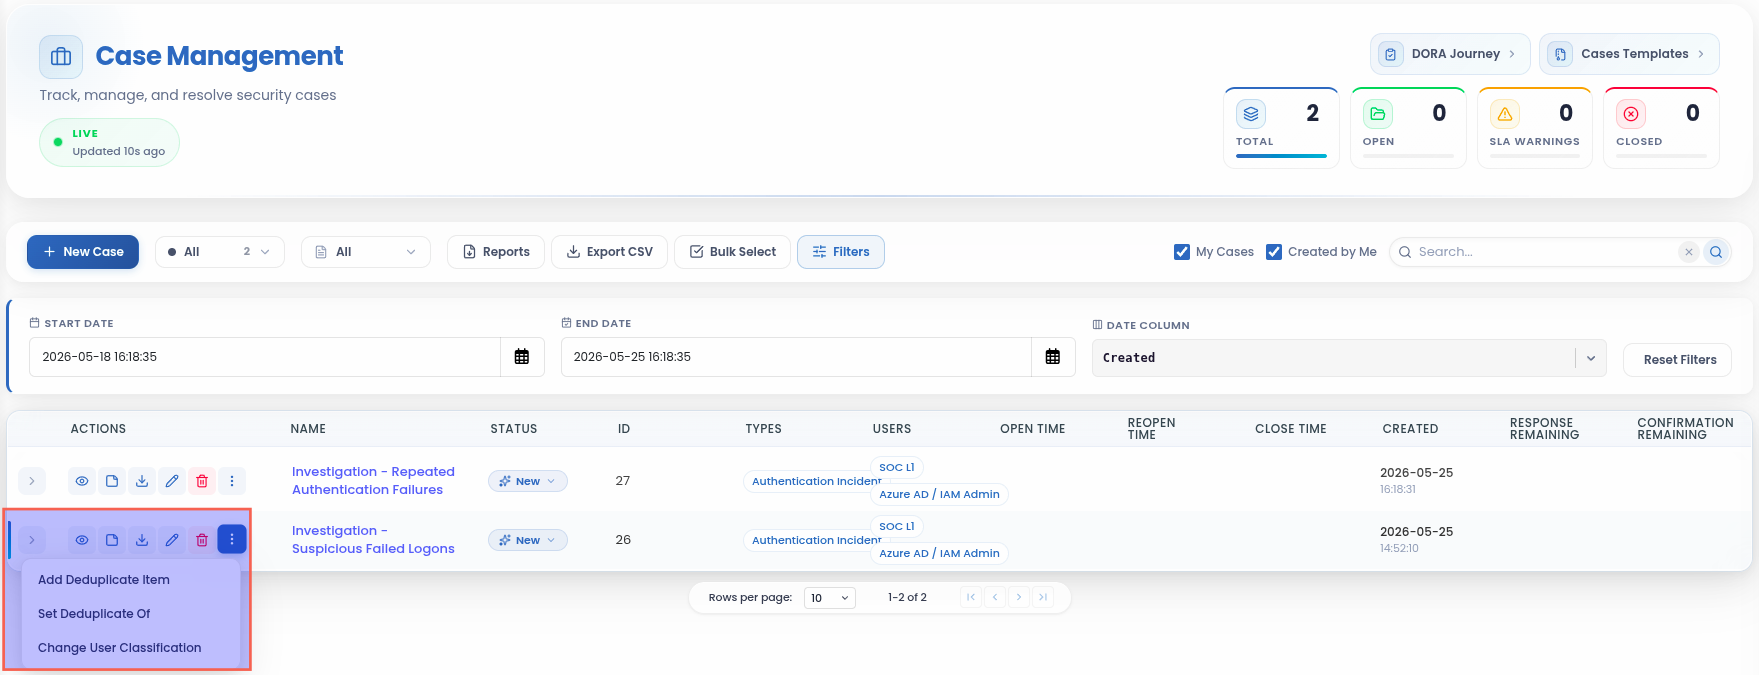
In the deduplication selection window, review the selected cases and the Duplicate Of relationship. After confirming the selection, click the confirmation button to apply the deduplication relationship.
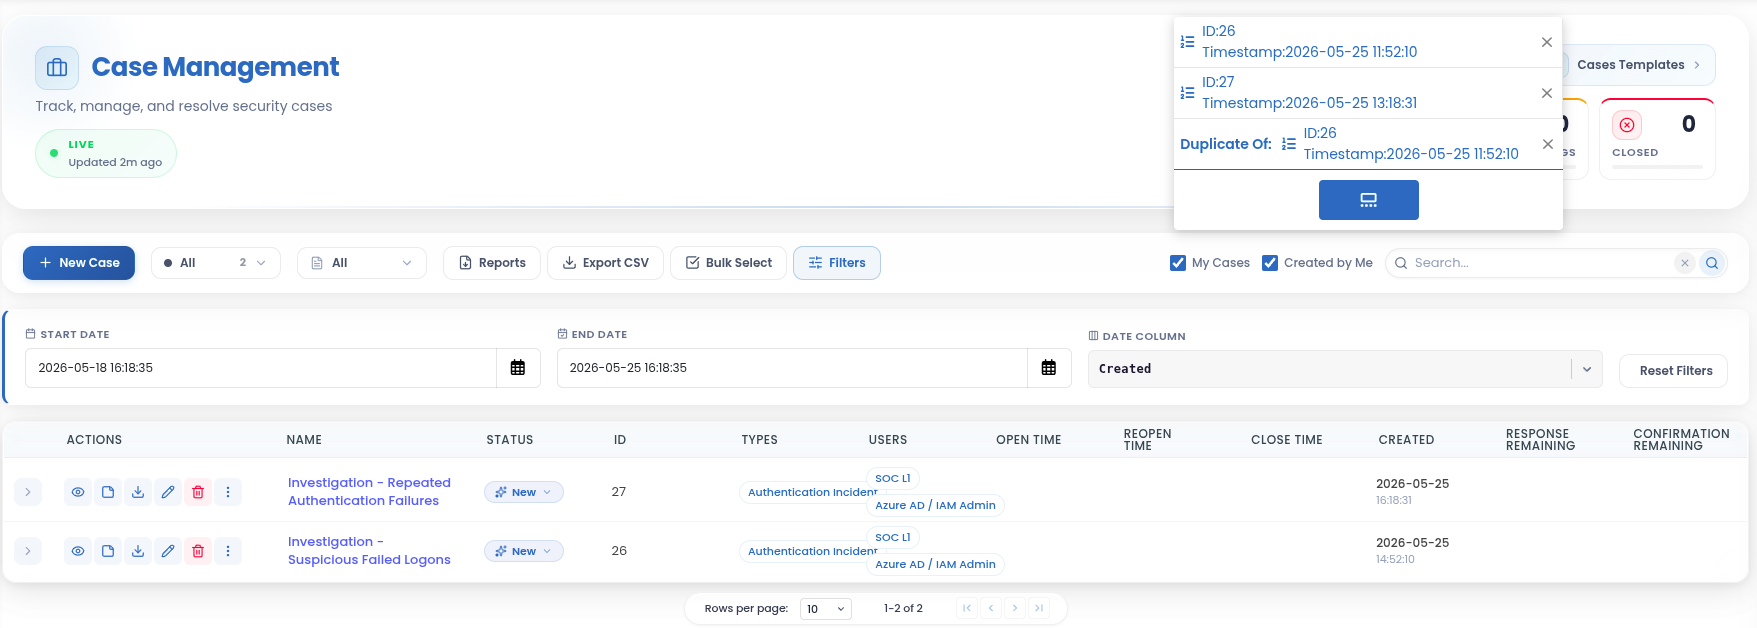
Deduplication Options:
Add Deduplicate Item: Adds the current case to a temporary list of items that are considered potential duplicates. This list is used to build a set of related cases before assigning a primary case.
Set Deduplicate Of: Assigns the current case as a duplicate of another case selected from the list previously built using Add Deduplicate Item. This action establishes a clear relationship between the duplicate case and the primary case, consolidating all relevant information under the primary case.
Once the deduplication is applied, the relationship is displayed in the Duplication Info section of the case details view.
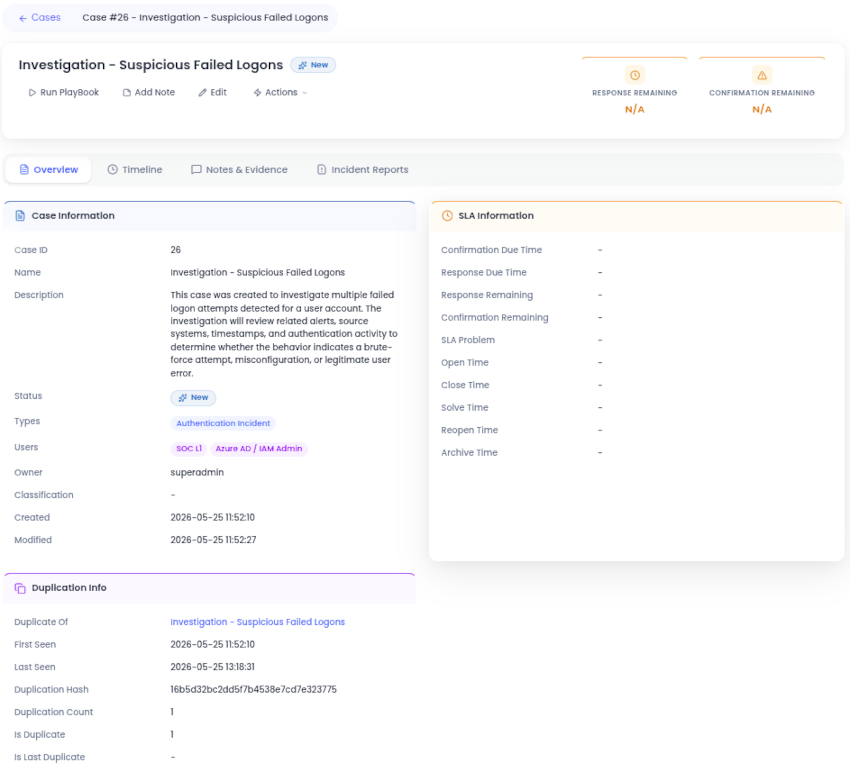
The Duplication Info section displays details about the deduplication relationship, including the primary case, first seen and last seen timestamps, duplication hash, duplication count, and whether the current case is marked as a duplicate.
For example, if Investigation - Repeated Authentication Failures refers to the same activity as Investigation - Suspicious Failed Logons, the analyst can add the repeated authentication case as a deduplication item and then set it as duplicate of the suspicious failed logons case.
Create a New Case
The Case Management module allows users to create investigation records that group related alerts, evidence, notes, and user activity into a structured workflow. Each case acts as a central workspace for tracking investigation progress, assigning responsibilities, documenting findings, and maintaining a clear audit trail throughout the incident lifecycle.
To create a new case, click the ![]() button. This opens the case creation window.
button. This opens the case creation window.
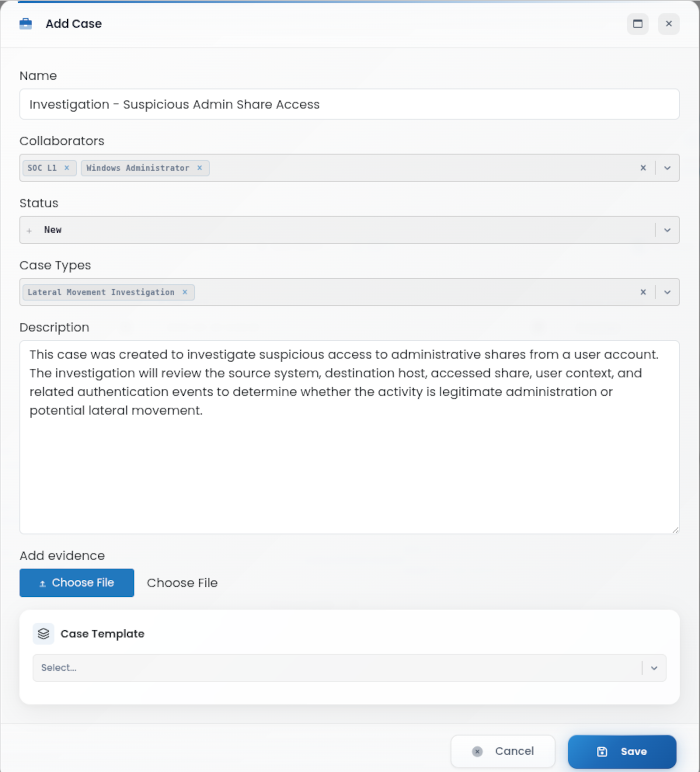
The following fields can be configured:
Name: Enter a clear and descriptive case title that reflects the issue being investigated. Using a consistent naming convention helps improve traceability and makes cases easier to identify later.
Collaborators: Select the users who will participate in the investigation or require access to the case. Collaborators can review case details, add notes, upload evidence, and contribute to the investigation process.
Status: Select the current phase of the case from the dropdown menu:
New- The case has been created and is awaiting initial review or triage.Open- The case is actively being investigated by the security team.Solved- The issue has been resolved, but the case may still require final validation or documentation.Closed- The case has been completed and no further action is required.Archived- The case has been retained for historical, audit, or compliance purposes.
It is recommended that each organization defines an internal procedure for when cases should move between statuses such as New, Open, Solved, Closed, and Archived.
Case Types: Select the category that best describes the investigation. Case types help organize, filter, and analyze cases based on the nature of the incident.
Description: Provide a short explanation of the case context, including why the case was created, what activity is being investigated, and what the expected analysis should cover.
Evidence: Upload supporting files related to the case, such as logs, screenshots, exported alerts, reports, or other relevant investigation materials.
Case Template: Select a predefined template to standardize the case structure. Templates are managed in the Case Templates section and help reduce manual effort when creating recurring or similar investigation cases.
Click the “Save” button to apply the changes and create the case, or select “Cancel” to discard and return to the main page.
Edit Case
To modify an existing case, click the ![]() button. The Edit Case window allows updates to key case details like as title, status, description, collaborators, attached evidence, and case template. After making the necessary changes, click “Save” to confirm or “Cancel” to discard and return to the main page.
button. The Edit Case window allows updates to key case details like as title, status, description, collaborators, attached evidence, and case template. After making the necessary changes, click “Save” to confirm or “Cancel” to discard and return to the main page.
Generate Reports
The Generate Reports feature allows users to export case information from the Case Management module for documentation, review, audit, or compliance purposes. Reports are generated in HTML format and can include either a general case overview or a more detailed report based on selected case data tables.
To generate a report, click the ![]() button from the Case Management toolbar. This opens the report generation window.
button from the Case Management toolbar. This opens the report generation window.
The following report types are available:
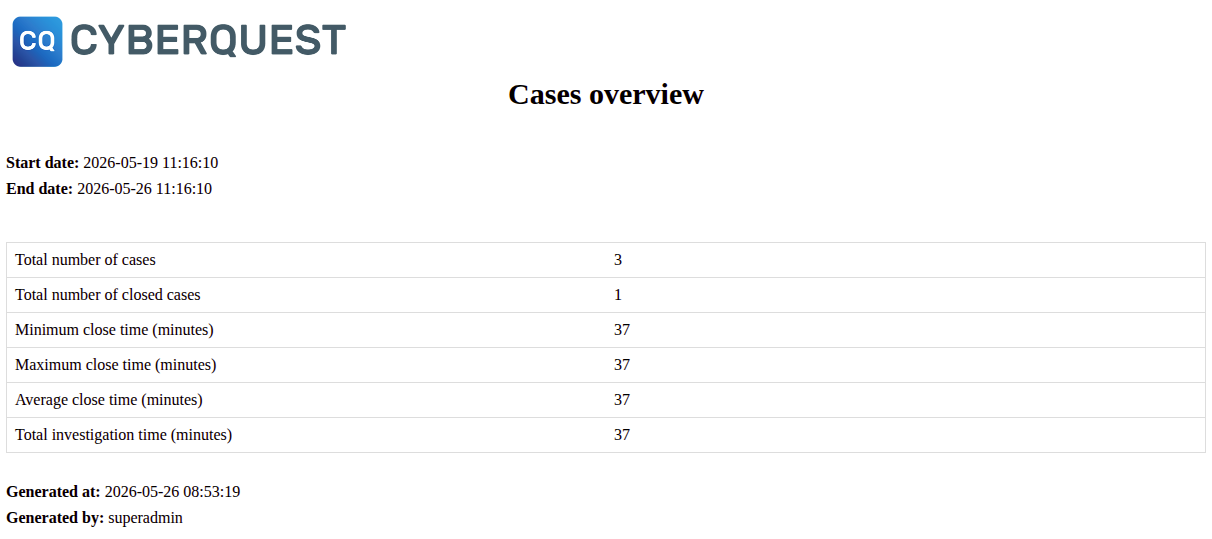
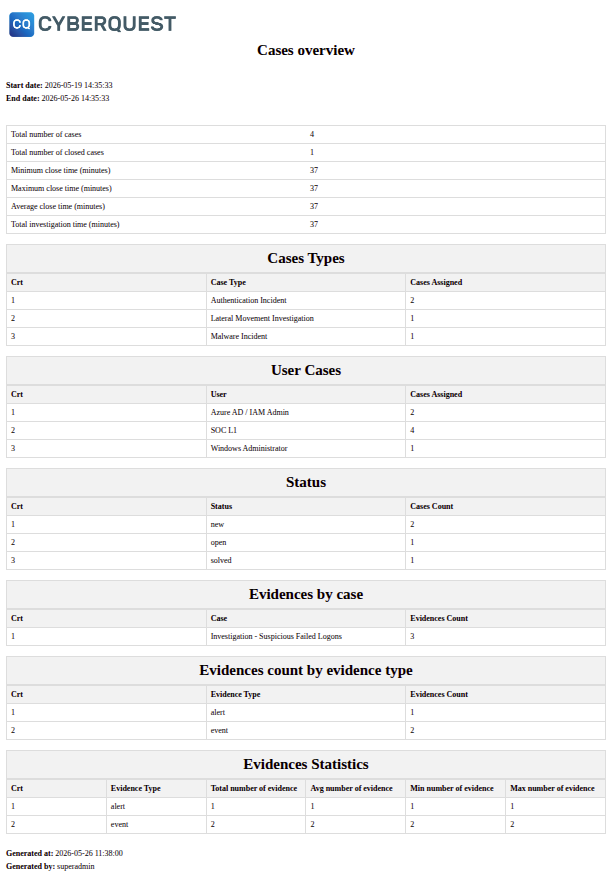
- Summary Report - Generates a general overview of the cases available in Case Management. This report includes high-level statistics such as the total number of cases, closed cases, close time values, total investigation time, and generation details.
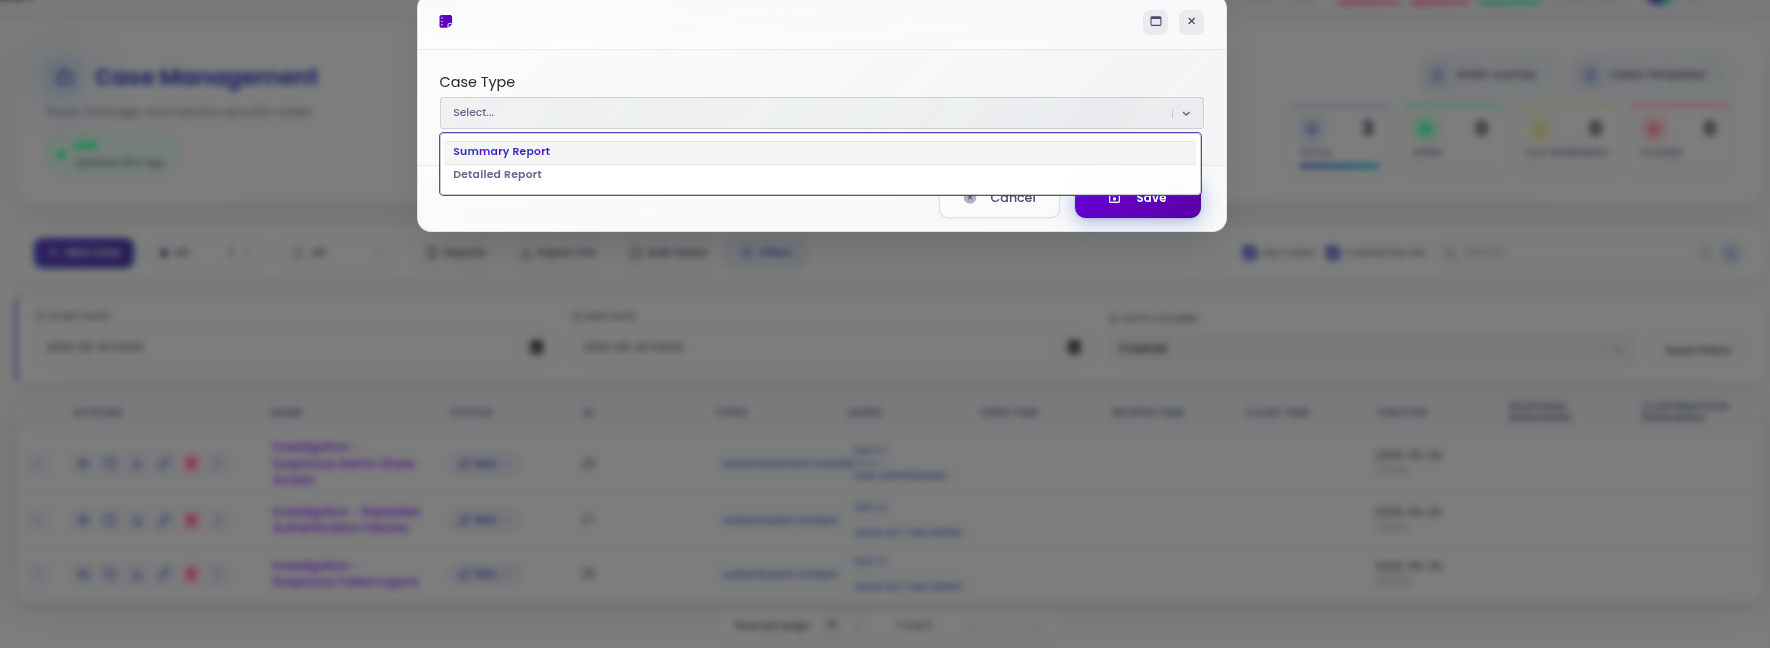
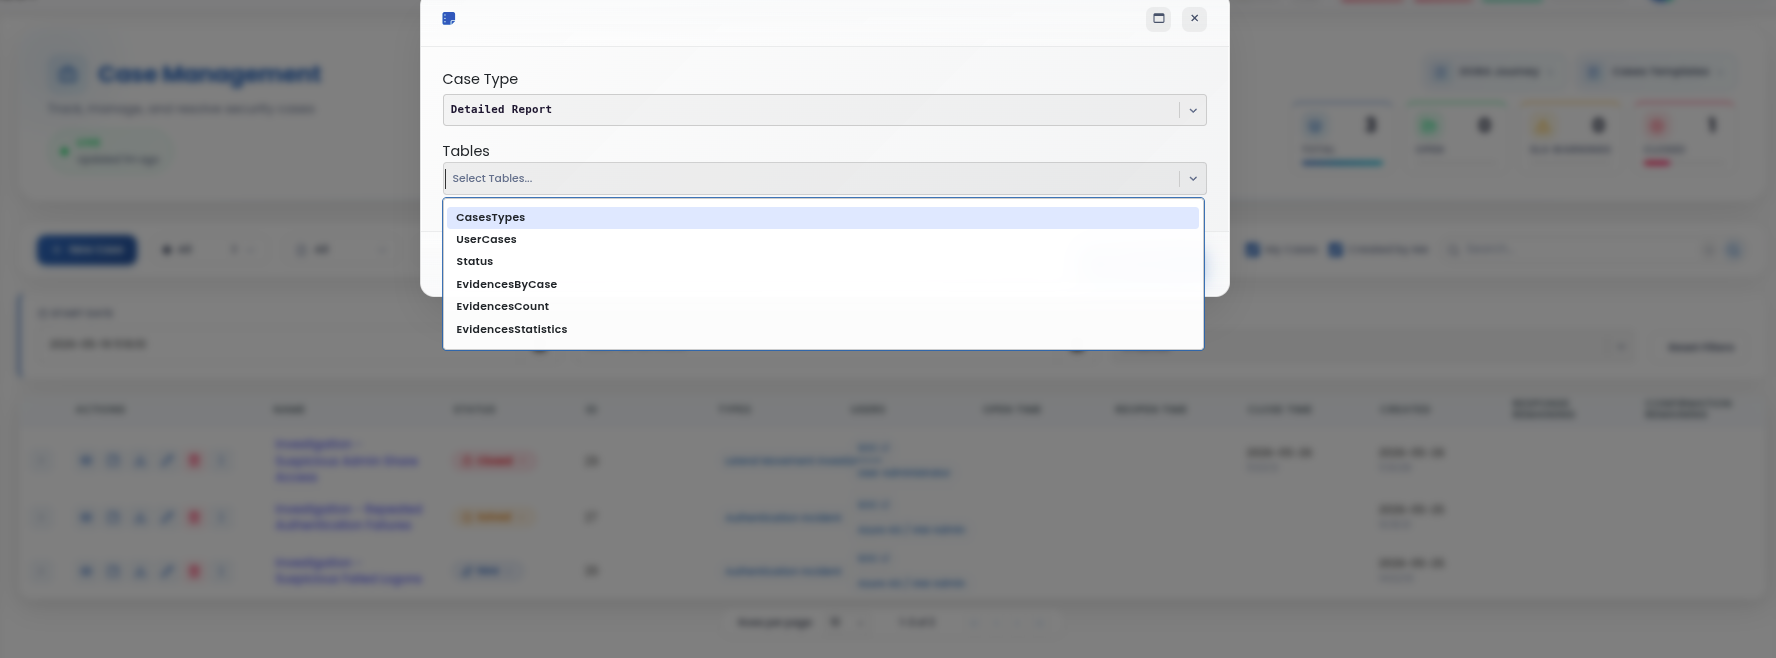
Detailed Report - Allows the user to generate a customized case report by selecting specific tables from the available list. This option is useful when the report must include only certain categories of case information.
When Detailed Report is selected, the Tables field becomes available. From this drop-down list, users can choose the information that should be included in the exported report.
Available tables may include:
- CasesTypes - Displays case distribution by case type.
- UserCases - Displays the number of cases assigned to each user.
- Status - Displays case count grouped by status.
- EvidencesByCase - Displays the number of evidence items linked to each case.
- EvidencesCount - Displays evidence count grouped by evidence type.
- EvidencesStatistics - Displays evidence-related statistics, such as total, average, minimum, and maximum evidence count.
After selecting the report type and the required tables, click Save to generate the report. The exported HTML file can then be used for internal documentation, investigation review, management reporting, or audit evidence.
Associating Events/Alerts with a Case
Case Management is tightly integrated throughout key CYBERQUEST investigation modules, enabling seamless transition from threat identification to investigation. This integration allows security analysts to efficiently convert potential security incidents identified in other modules directly into managed cases. Wherever the Case Management action menu is available - typically accessible via an action arrow - items can be used as evidence by creating a new case or attaching them to an existing one.
Integration with Browser Module
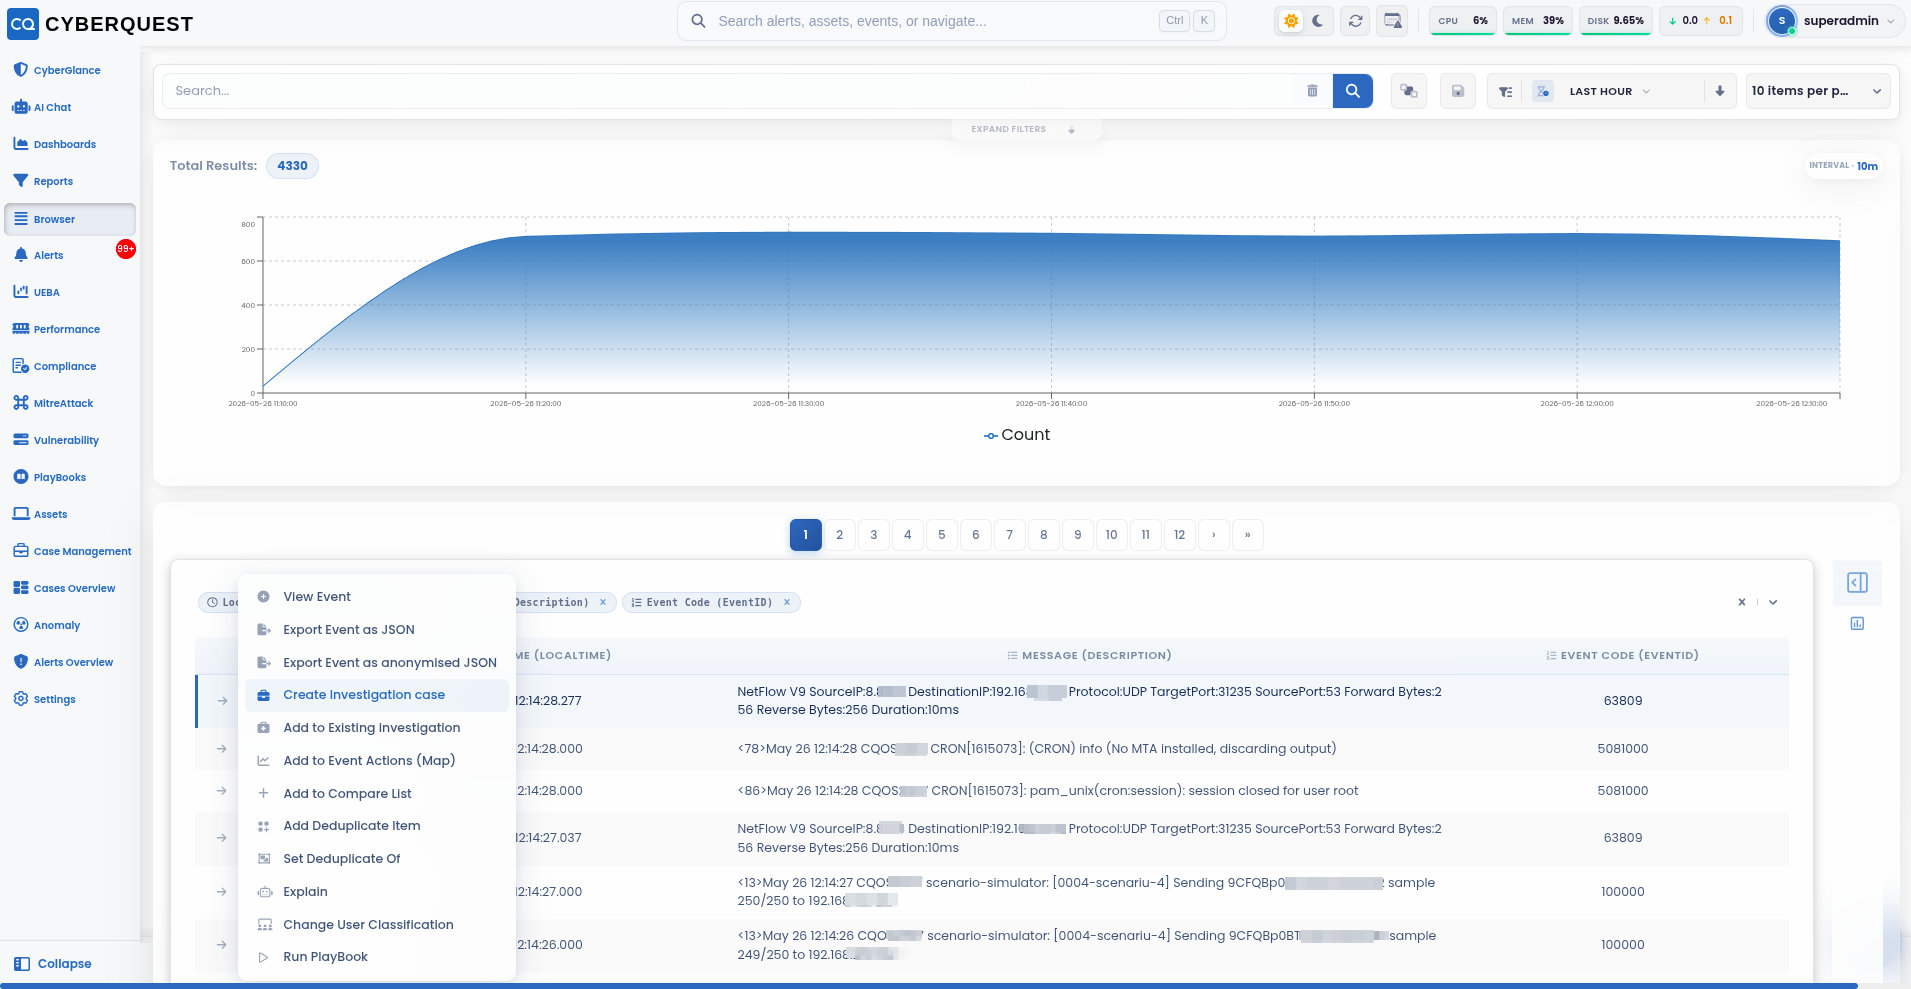
The Browser module allows users to review, filter, and analyze security events in detail. When an analyst identifies an event that requires further investigation, the event can be used to create a new investigation case or can be added as evidence to an existing case.
To create or update an investigation case from the Browser module:
- Navigate to the Browser module and locate the event that requires investigation.
- Click the
 icon next to the selected event to open the event actions menu.
 - From the actions menu, select one of the following options:
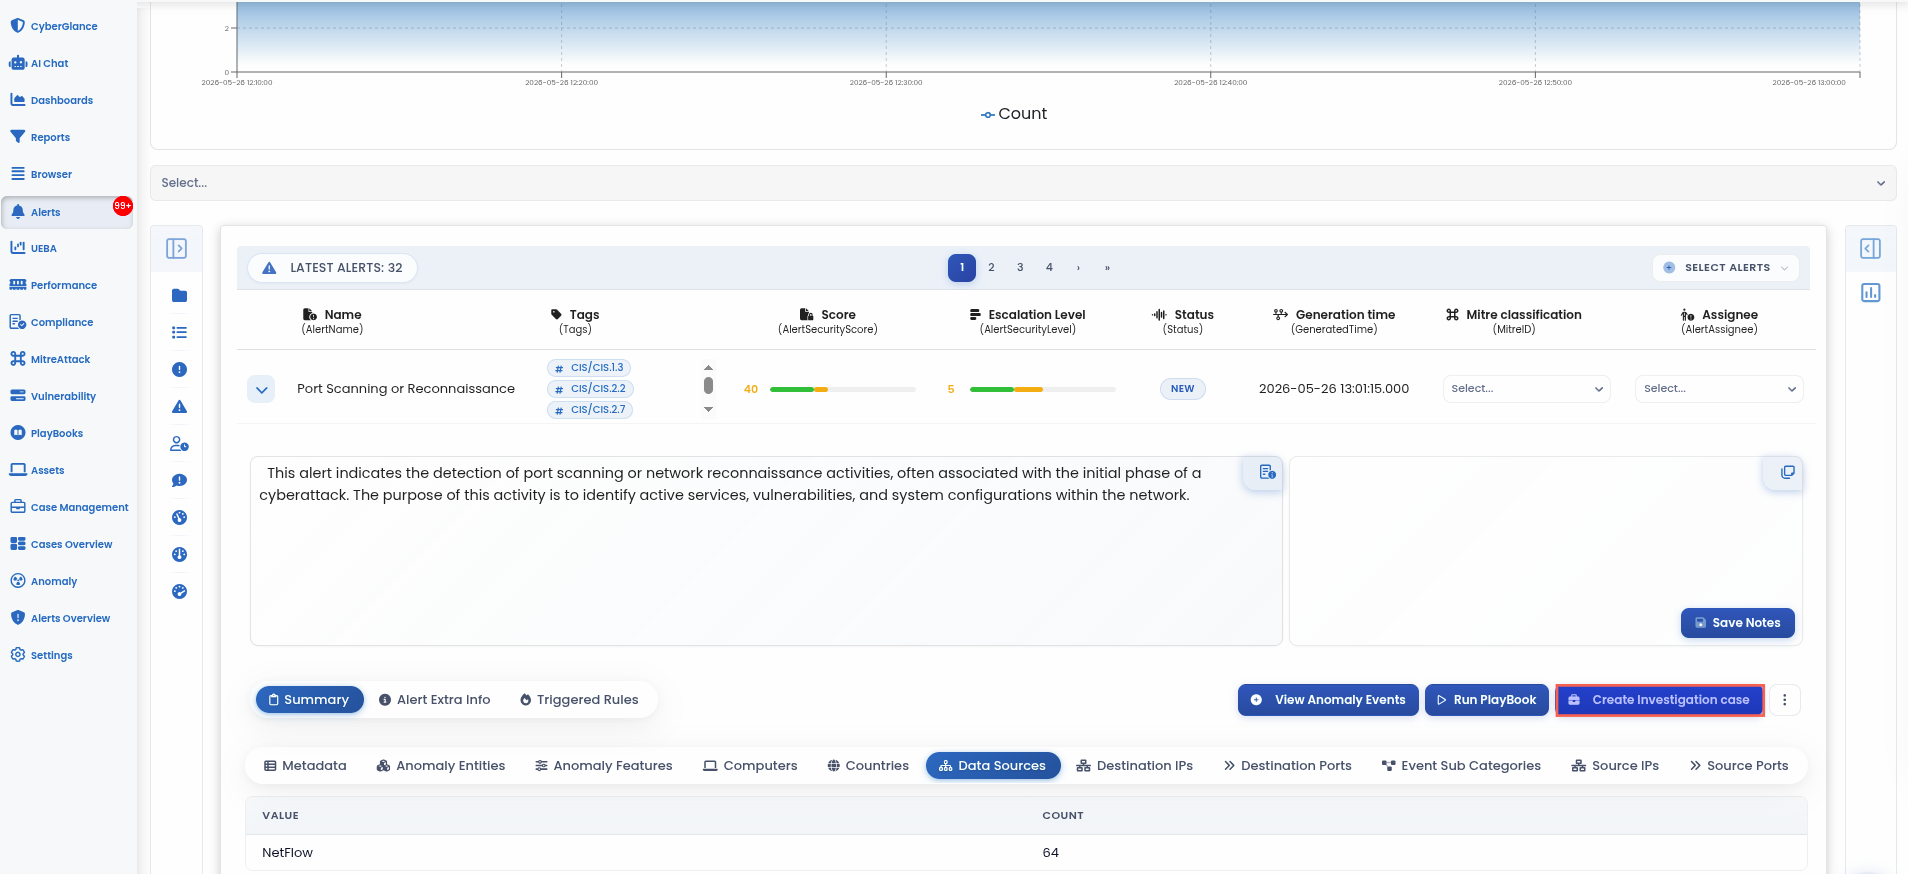
- Create Investigation Case - Opens a new case creation window and automatically adds the selected event as evidence for the new case.
- Add to Existing Investigation - Allows the user to select an existing case and attach the selected event as evidence to that investigation.
Integration with Alerts Module
The Alerts module allows analysts to create or update investigation cases directly from detected alerts. When an alert requires further analysis, it can be converted into a new case or attached as evidence to an existing investigation.
To create or update a case from an alert:
Navigate to the Alerts module and locate the alert that requires investigation.
Click the
 button to expand the alert details.
From the expanded alert view, use one of the available investigation actions:
Create Investigation Case - Opens a new case creation window and automatically adds the selected alert as evidence for the new case.
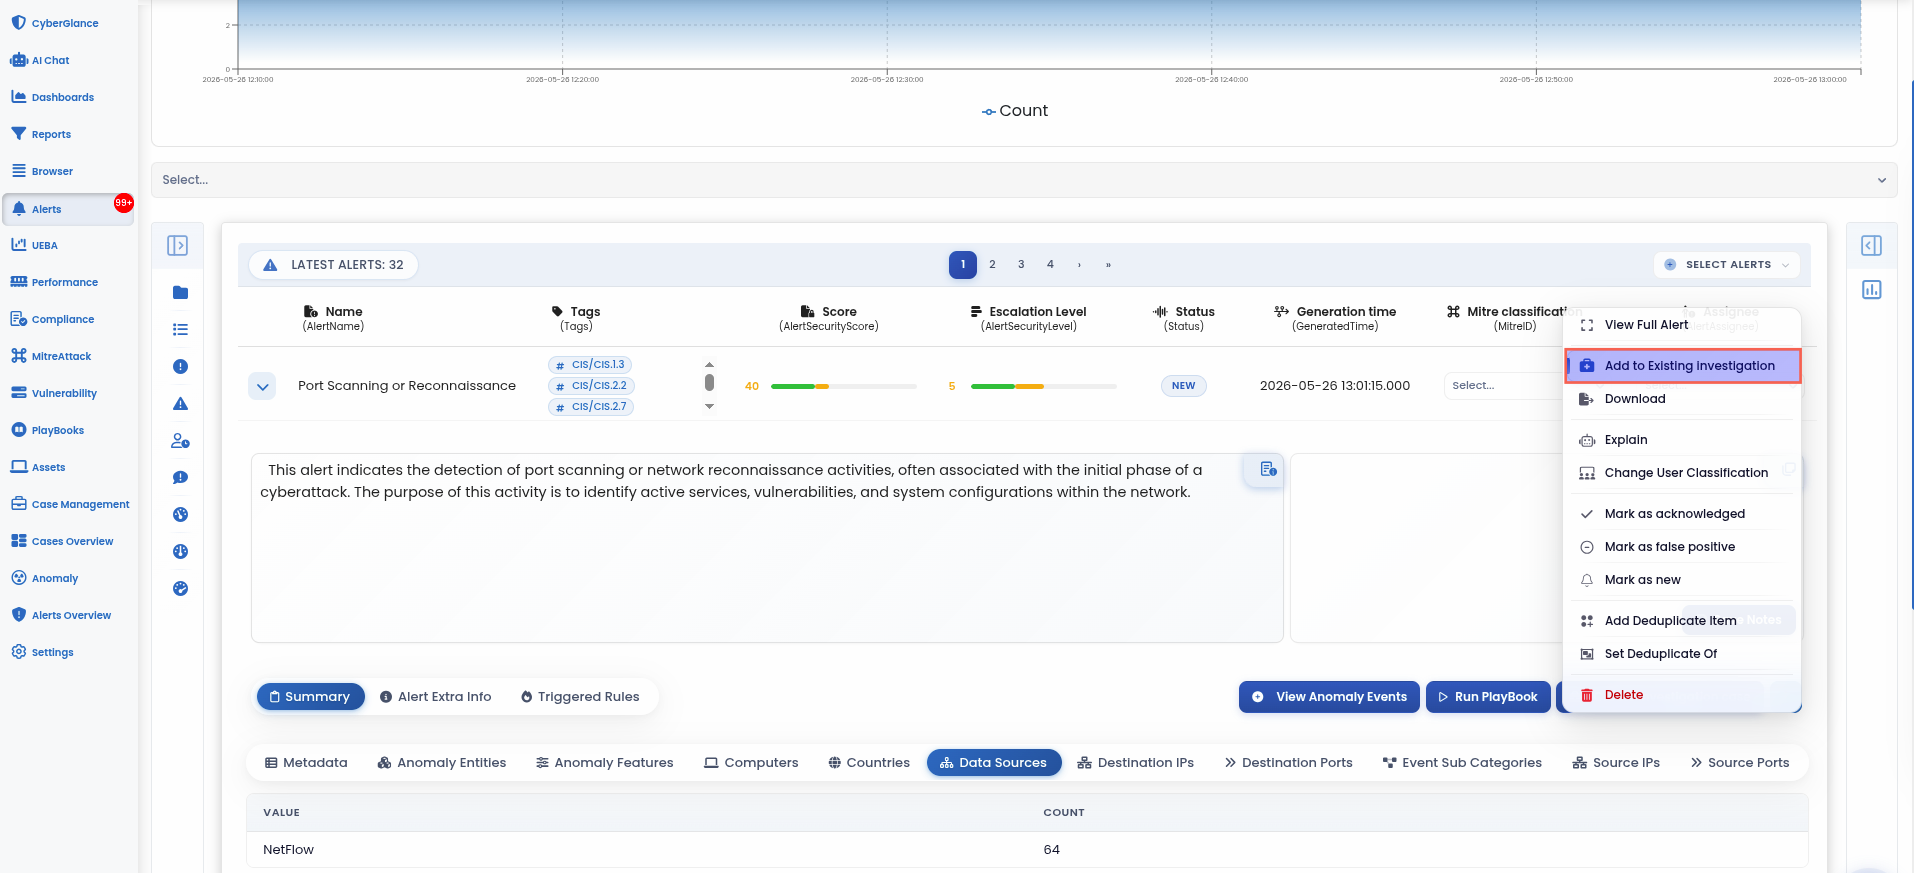
Add to Existing Investigation - Adds the selected alert as evidence to an already existing case. This option is available from the alert actions menu by clicking the three-dot menu on the right side of the alert action bar.
Case Overview
The Case Overview module provides a graphical summary of case activity across the organization. It can be accessed at any time by clicking the ![]() button from the quick access menu on the left side of the web interface.
button from the quick access menu on the left side of the web interface.
This view helps users monitor case volume, investigation progress, overdue confirmations, overdue responses, user workload, and status distribution within a selected time range.
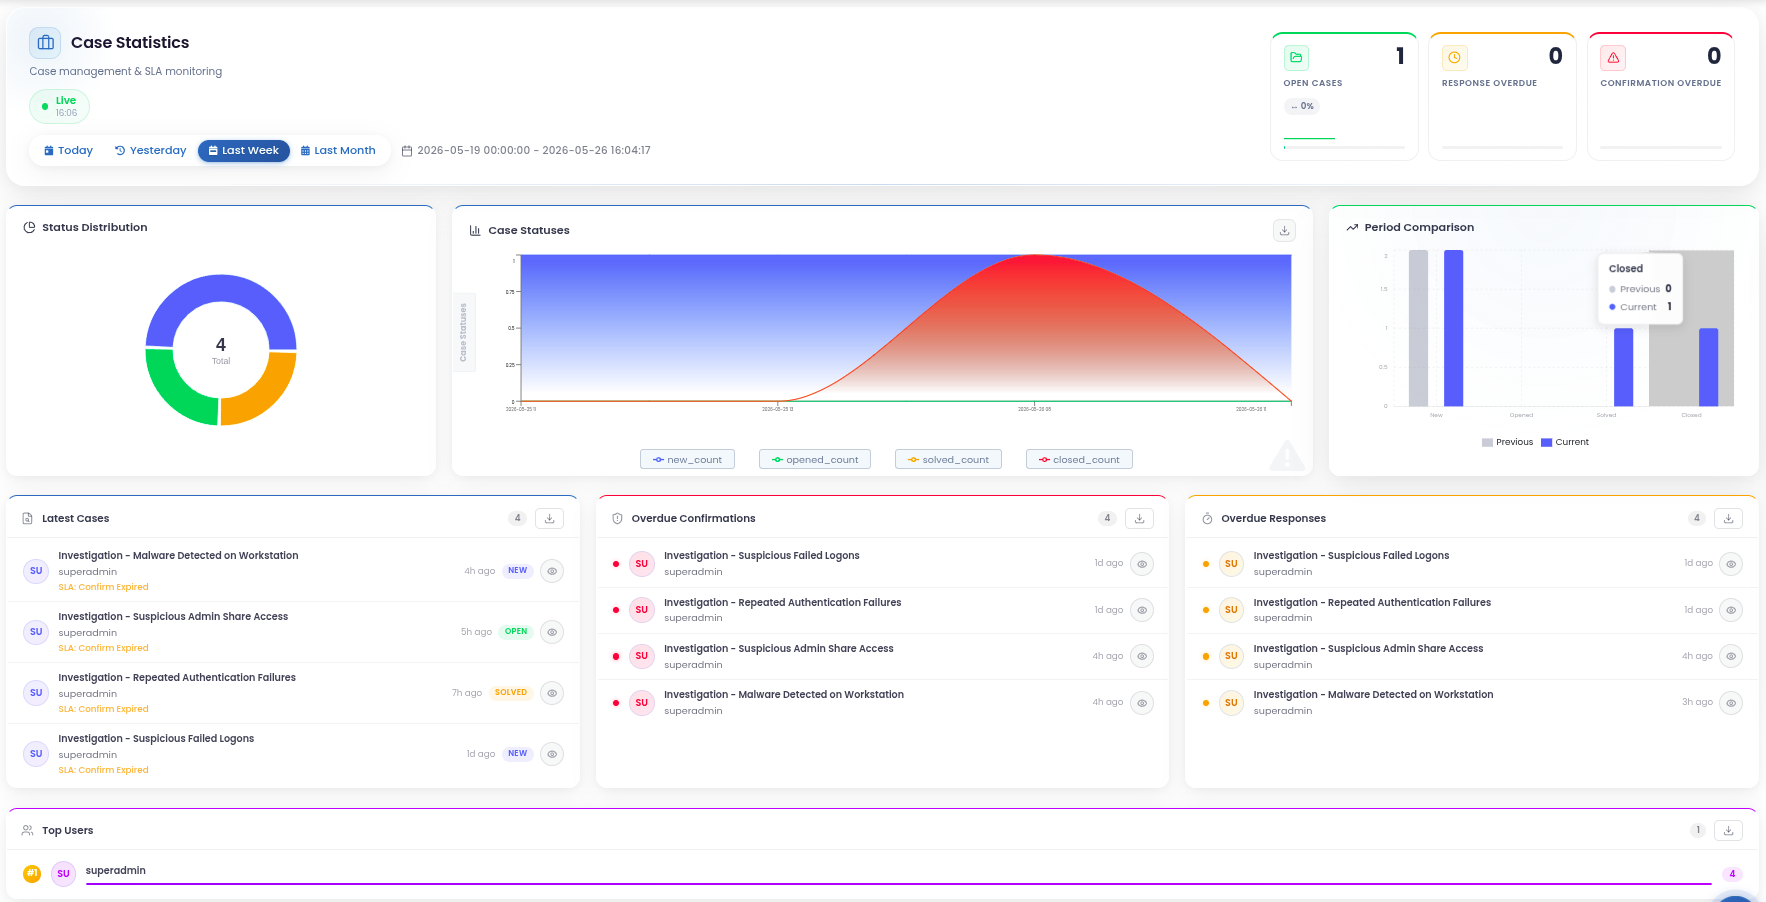
The top section displays the main case indicators:
Open Cases - Shows the total number of cases currently marked with the Open status.
Response Overdue - Shows the number of cases where the configured response time has been exceeded.
Confirmation Overdue - Shows the number of cases where the configured confirmation time has been exceeded..
The date range selector allows users to filter the displayed information by predefined intervals such as Today, Yesterday, Last Week, or Last Month. The selected interval controls the data shown in the charts and summary panels.
The dashboard includes the following sections:
Status Distribution - Displays the distribution of cases by status, such as New, Open, Solved, Closed, and Archived.
Case Statuses - Shows how case statuses evolved over the selected time interval.
Period Comparison - Compares case status values between the current and previous selected periods.
Latest Cases - Displays the most recently modified cases, including case name, owner, status, and confirmation/response state.
Overdue Confirmations - Lists cases where the confirmation time has been exceeded.
Overdue Responses - Lists cases where the response time has been exceeded.
Top Users - Displays the users associated with the highest number of cases, helping identify workload distribution across analysts or teams.
To export data from the Case Overview in CSV format, click the ![]() button.
button.
CYBERQUEST - DORA Regulatory Assistance Module
The DORA Regulatory Assistance module extends the CYBERQUEST Case Management workflow with dedicated support for incident handling and regulatory reporting under the Digital Operational Resilience Act (DORA).
The module helps security teams document, classify, and report ICT-related incidents in a structured and traceable manner. It supports the creation of regulatory reports based on the reporting structure defined by DORA and the related EU implementing regulation: EUR-lex
The DORA module enhances the Case Management environment with dedicated regulatory assistance features:
DORA Journey - Provides a dedicated interface for following DORA-related compliance and readiness activities. It helps organizations track progress, identify gaps, and organize the steps required to support operational resilience and regulatory alignment.
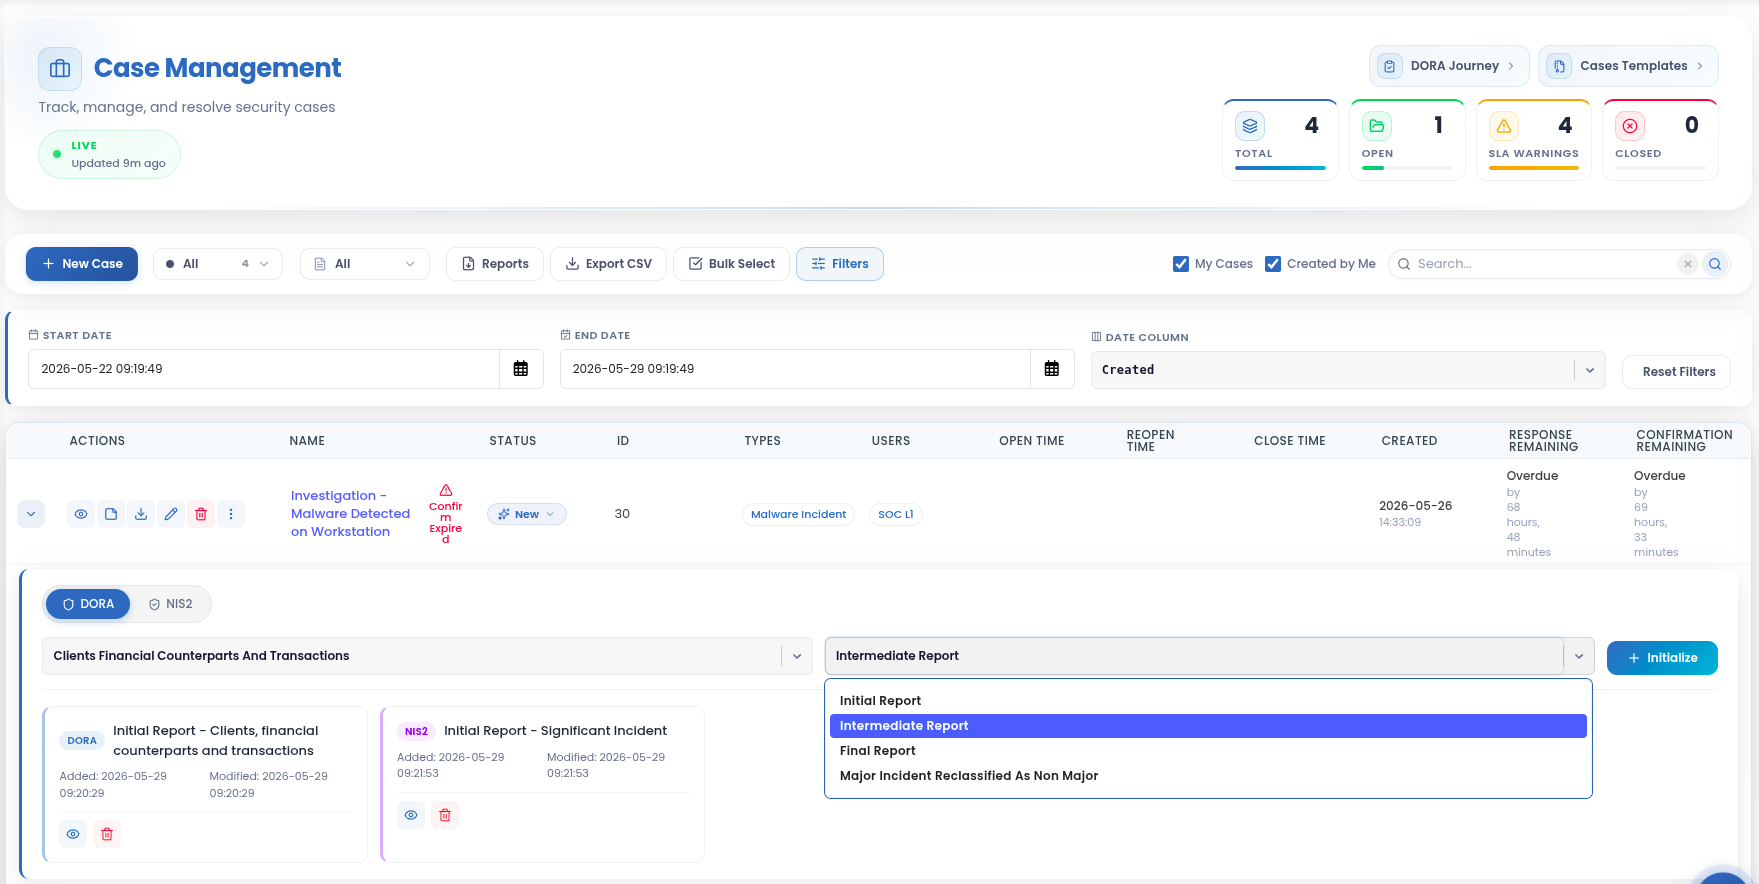
Incident Reporting - Allows users to generate structured incident reports directly from a case. Depending on the reporting stage, users can initialize report types such as Initial Report, Intermediate Report, Final Report, or Major Incident Reclassified as Non-Major.
Standardized Report Structure - Helps ensure that incident reports follow a consistent format aligned with DORA reporting expectations. This reduces manual effort and supports more reliable documentation during incident response.
Case-Based Evidence Collection - Links regulatory reporting with investigation data already available in the case, including alerts, evidence, notes, timelines, status changes, and assigned users.
Incident Classification Support - Enables analysts to classify incidents according to the selected regulatory context, helping determine whether an event requires formal reporting or internal handling.
By integrating DORA reporting into the investigation workflow, CYBERQUEST helps organizations move from detection and case management to structured regulatory documentation, reducing reporting effort and improving audit readiness.
CYBERQUEST - NIS2 Regulatory Assistance Module
The NIS2 Regulatory Assistance module extends the CYBERQUEST Case Management workflow with dedicated support for incident documentation and reporting under the NIS2 Directive. NIS2 aims to establish a high common level of cybersecurity across the European Union and introduces cybersecurity risk-management and reporting requirements for essential and important entities.
The NIS2 module helps security teams manage significant incidents in a structured and traceable way, directly from an investigation case. Users can select the NIS2 reporting option, choose the relevant incident category, and initialize the appropriate report type.

The available NIS2 report types include:
- Initial Report - Used to create the first incident report when a significant incident is identified and requires formal documentation.
- Intermediate Report - Used to provide updated information as the investigation progresses or when additional findings become available.
- Final Report - Used to document the completed investigation, including impact, root cause, actions taken, and final conclusions.
- Significant Incident Reclassified as Non-Significant - Used when an incident initially considered significant is later reassessed and no longer meets the reporting criteria.
The NIS2 module enhances the Case Management environment with dedicated regulatory assistance features:
- Incident Reporting - Allows users to generate structured reports directly from a case, keeping the investigation context linked to the reporting process.
- Case-Based Evidence Collection - Uses case information, evidence, notes, timelines, and related alerts to support incident documentation.
- Standardized Report Structure - Helps ensure that NIS2 incident reports follow a consistent format, reducing manual effort and supporting audit readiness.
- Incident Classification Support - Helps analysts classify and manage incidents according to the selected NIS2 reporting context.
By integrating NIS2 reporting into the case workflow, CYBERQUEST helps organizations connect security operations with regulatory documentation, making incident handling more consistent, traceable, and easier to review.