Documentation
OpenSearch Management
Inspect and administer the OpenSearch cluster
NETALERT stores traffic, alerts and packet data in OpenSearch, in daily indices such as
day_traffic_*, day_alerts_* and day_pcap_*. The OpenSearch Management page shows the
health of that cluster and lets you carry out routine index administration from the web interface,
without a separate cluster tool.
The page works on the cluster of the instance you are managing. When a remote instance is selected in the Administration instance selector, every request goes to that instance’s cluster.
Every change made from this page, including failed attempts, is written to the audit log.
Navigate to Administration > System Configuration > OpenSearch Management.
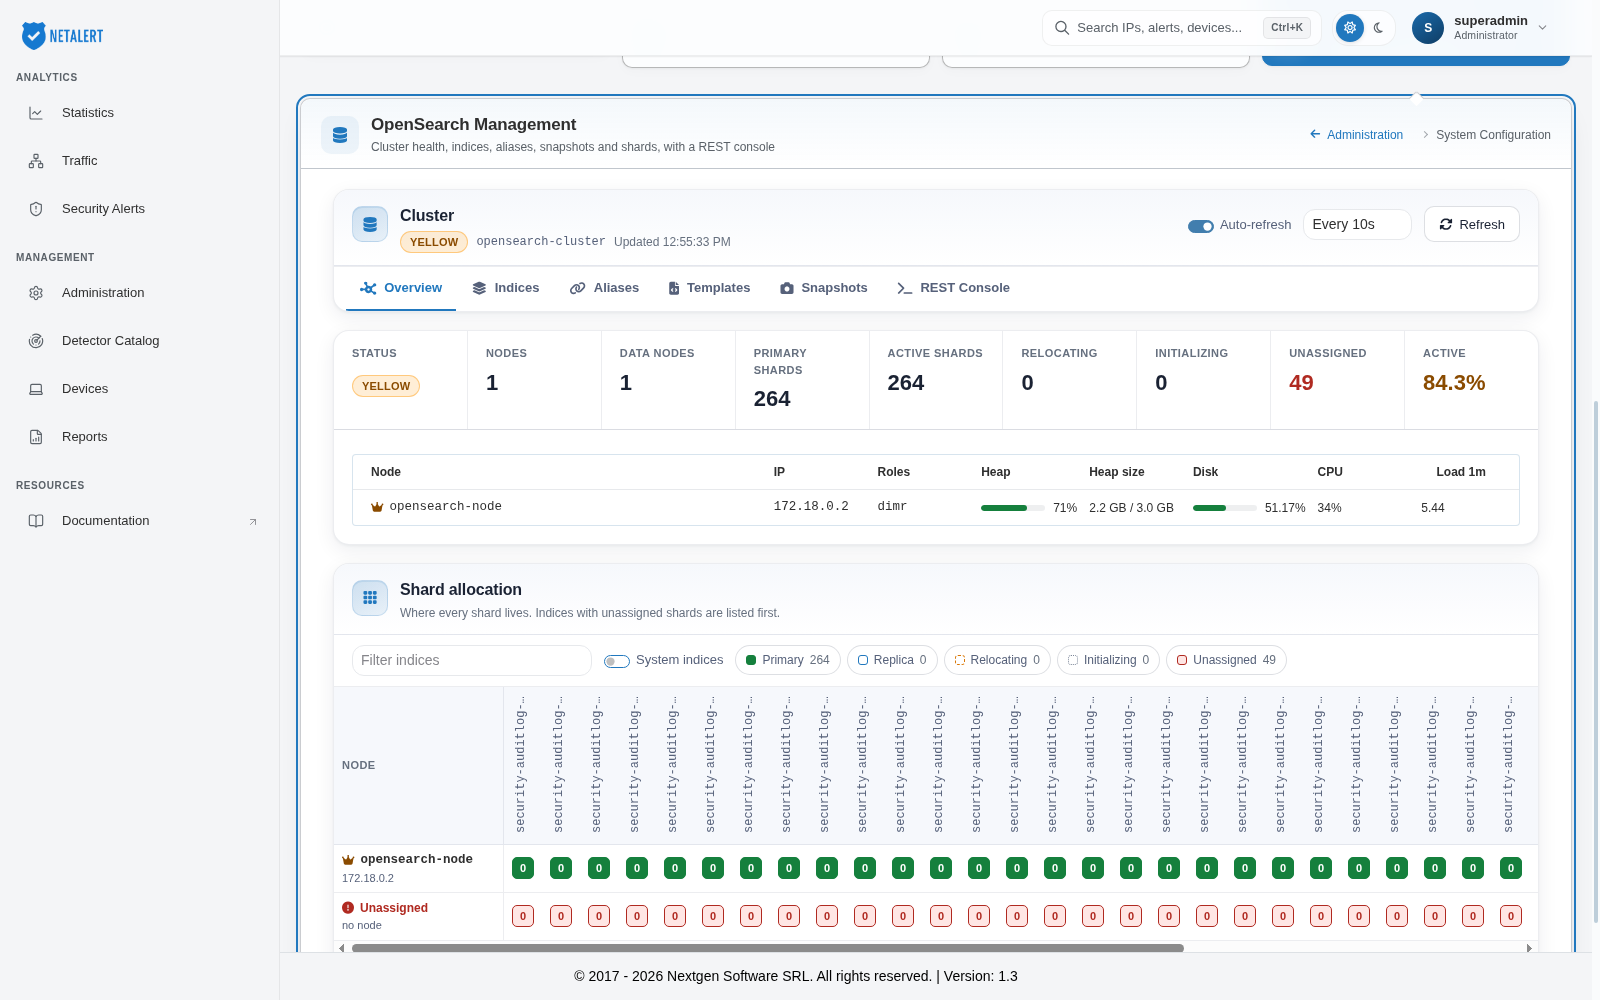
Cluster header
The header shows the cluster status (GREEN, YELLOW or RED, or UNREACHABLE if the cluster cannot be contacted), the cluster name and the time of the last update. The following controls are available:
- Auto-refresh – Reloads the cluster data automatically at the interval selected in the list next to it (every 5, 10, 15, 30 or 60 seconds; 10 seconds by default). Auto-refresh applies to the Overview, Indices and Aliases tabs, and pauses while the browser tab is hidden.
- Refresh – Reloads the data immediately.
The page is organised into six tabs.
Overview
The Overview tab summarises the cluster:
- Cluster figures – Status, the number of nodes and data nodes, primary and active shards, shards that are relocating, initializing or unassigned, and the percentage of shards that are active. Unassigned shards are the usual reason a cluster is yellow or red.
- Nodes – One row per node, with its IP address, roles (
ddata,iingest,mcluster manager eligible,rremote client), heap usage, disk usage, CPU and 1-minute load. The elected cluster manager is marked with a crown. - Shard allocation – A matrix of nodes against indices showing where each shard is placed. Unassigned shards have their own row, and indices that hold unassigned shards are listed first. Use Filter indices to narrow the matrix, System indices to include indices whose names start with a dot, and the state buttons (Primary, Replica, Relocating, Initializing, Unassigned) to show or hide each kind of shard. The matrix shows the first 40 matching indices; select show all to display the rest.
On a single-node installation, replica shards cannot be placed on another node, so they appear as unassigned and the cluster reports a yellow status.
Indices
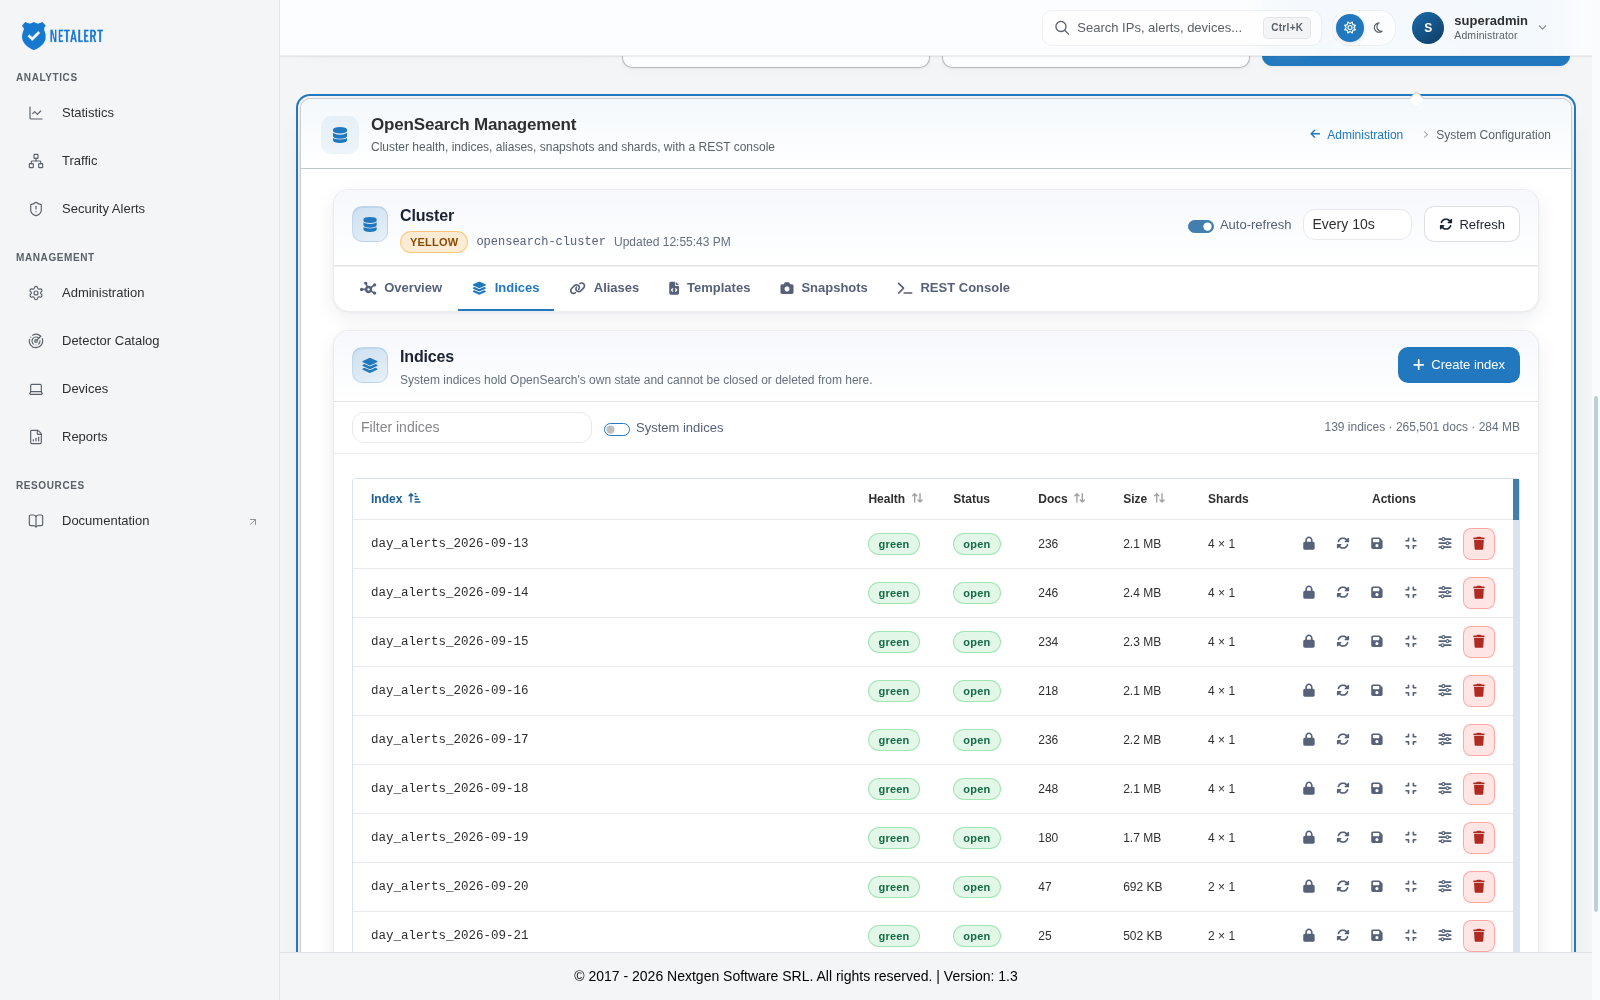
The Indices tab lists every index with its Health, Status (open or closed), number of Docs, Size and Shards (primaries × copies). The totals for the listed indices appear above the table. Use Filter indices to search by name, and System indices to include indices whose names start with a dot.
The following actions are available:
- Create index – Create an empty index. Enter the Index name and the number of Primary shards (1 to 1024, fixed once the index exists) and Replicas (0 to 32). Both default to 1.
- Close / Open – A closed index stops accepting writes and disappears from searches until it is opened again. Any component still writing to it fails, so do not close an index that NETALERT is currently writing to.
- Refresh – Make recent writes to the index visible to searches.
- Flush – Commit the index’s in-memory data to disk.
- Force merge – Merge the index down to a single segment. This is I/O-intensive and should only be run on an index that no longer receives writes, such as a previous day’s index.
- Settings – View the index settings and apply changes, entered as a JSON object.
- Delete – Permanently remove the index and every document in it. To confirm, type the index name. A deleted index can only be recovered from a snapshot that contains it.
System indices cannot be closed or deleted from this page, because they hold OpenSearch’s own state. Index names are validated before any request is sent, so an action always applies to exactly one index and can never be widened with a wildcard.
To control how long NETALERT keeps its daily indices, use Retention Policies rather than deleting indices by hand.
Aliases
The Aliases tab lists alternate names that point at one or more indices, with the alias, the
index it points at, any filter, the index and search routing, and whether it is the write index.
NETALERT itself maintains aliases such as alerts_current.
- Create alias – Enter the Alias name, choose the open Index it points at, and optionally select Make this the write index.
- Remove alias – Remove the alias from that index. Anything that reads or writes through the alias stops reaching the index; the index itself is not changed.
Templates
The Templates tab lists the index templates, which supply the settings and mappings applied to
new indices whose names match a pattern, for example alerts_template for day_alerts* and
traffic_template for day_traffic*. Select a template to view its definition. Templates are
read-only on this page.
Snapshots
The Snapshots tab lists the snapshot repositories registered with the cluster and the snapshots each one holds, with their state, start and finish times, duration and shard counts. Select a snapshot to view its details and restore indices from it.
When you restore, choose the indices to restore. Restore under new names is selected by
default and adds a prefix (restored_ by default) to each restored index, so the restore does not
collide with existing indices. If you clear it, the indices are restored under their original
names, which fails for any index of that name that is still open; close or delete those indices
first. System indices are not restored from this page.
A repository has to be registered before snapshots can be taken or restored. If none is
registered, register one from the REST console, for example with PUT /_snapshot/<name> and a
file-system location that is listed in the node’s path.repo setting.
REST console
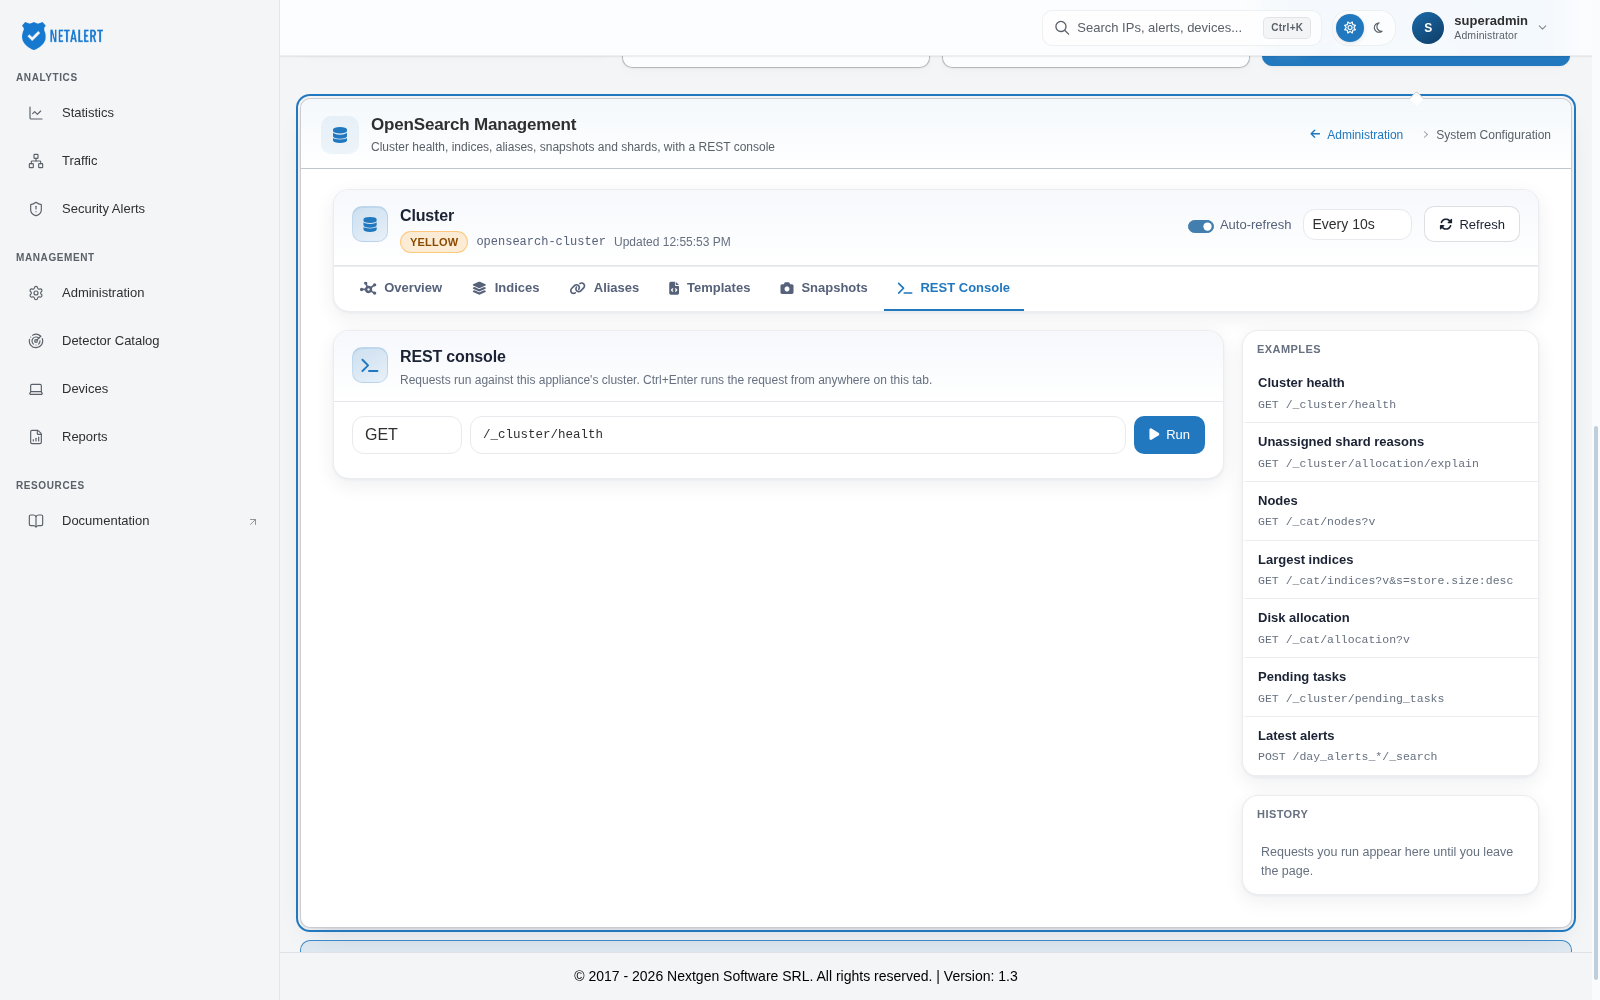
The REST console sends a request directly to the cluster. Select the method (GET, POST,
PUT, DELETE or HEAD), enter the endpoint (for example /_cluster/health), enter a JSON
request body where the method takes one, and select Run or press Ctrl+Enter. The response
status and body are shown below the request.
- Examples – Ready-made requests that fill in the form: cluster health, unassigned shard reasons, nodes, largest indices, disk allocation, pending tasks and the latest alerts.
- History – The requests you have run, kept until you leave the page. Select one to load it into the form again.
Requests other than GET and HEAD can change or delete cluster data and are written to the audit log. Use them with care: the console does not have the safeguards of the other tabs.