Documentation
Detector Catalog
Detector Catalog
NETALERT detects threats using three different engines, each suited to a different kind of evidence. The Detector Catalog gathers every detector from all three into a single list, so you can browse, filter, and inspect the complete detection surface in one place - including which detectors are active and which are not yet doing anything useful.
Navigate to Administration > Detection & Alerts > Detector Catalog, or click Detector Catalog in the Management section of the left sidebar.
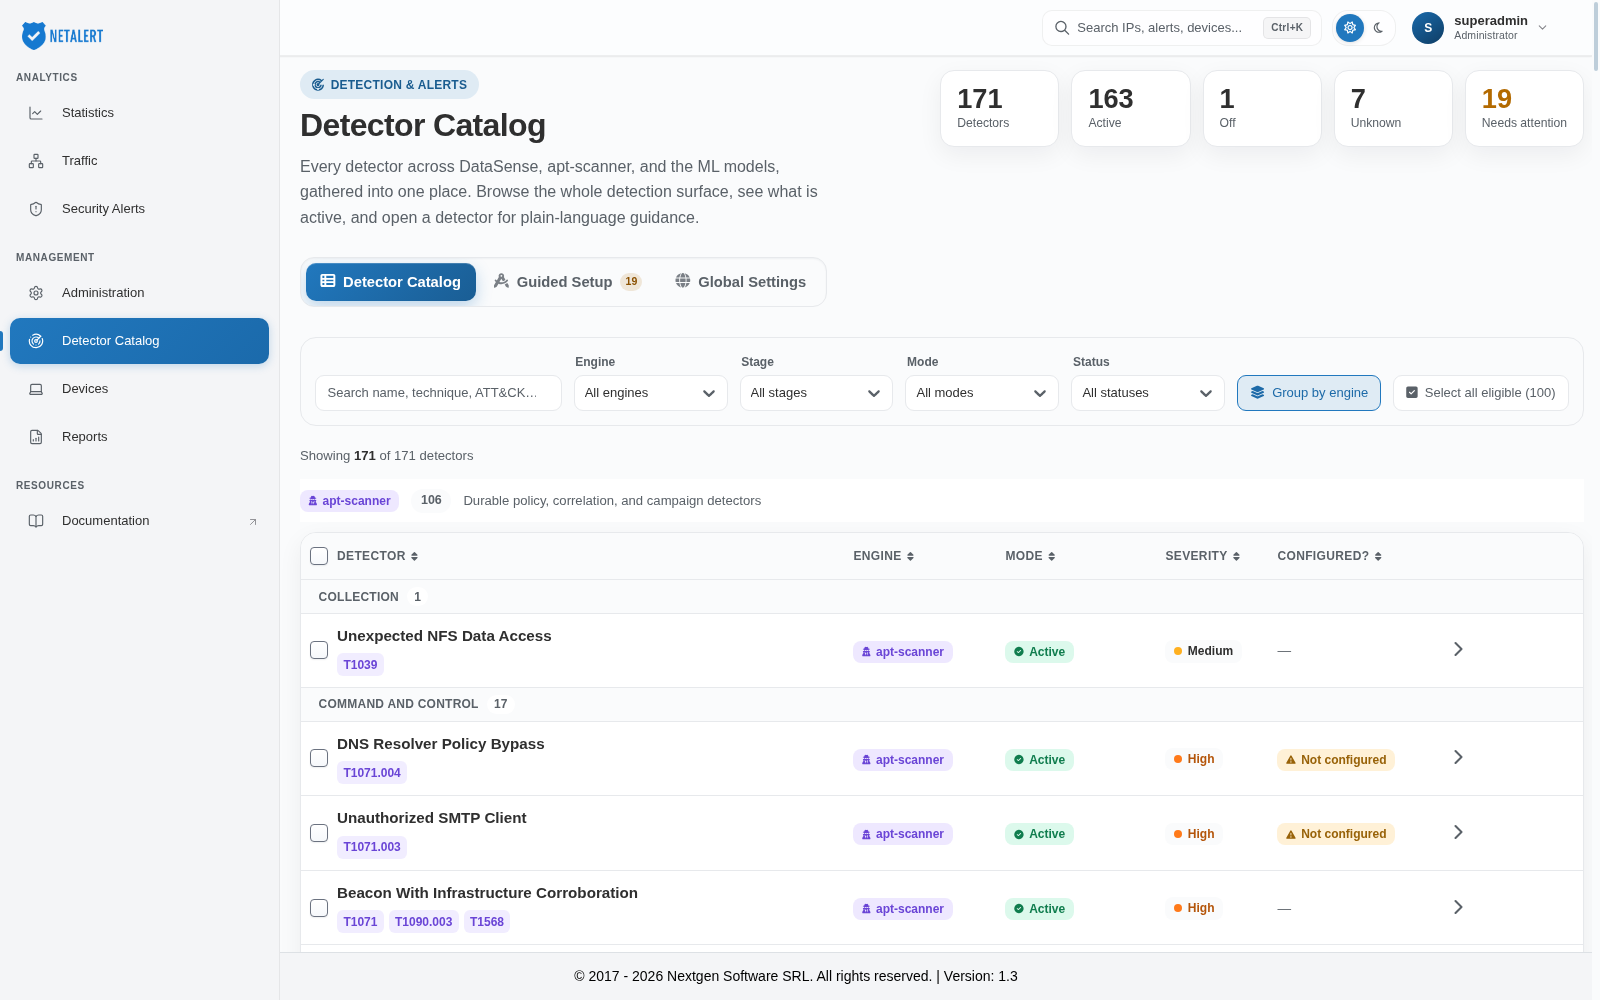
Summary
Five counters at the top of the page describe the current state of detection. Each counter is also a shortcut: click it to filter the list to the detectors it counts, and click Detectors to show the whole list again.
| Detectors | Total number of detectors available across all engines |
| Active | Detectors currently enabled |
| Off | Detectors that have been disabled |
| Unknown | Detectors whose on/off state could not be read from their engine’s settings |
| Needs attention | Detectors that are enabled but cannot yet raise an alert because the configuration they depend on has not been supplied |
Needs attention is the counter to watch. A detector in this state is switched on and appears to be working, but is inert - see Configured? below. The same count is shown as a badge on the Guided Setup tab.
The three engines
Each detector belongs to exactly one engine, shown as a coloured chip. The engines differ in the kind of question they answer:
| DataSense | Real-time flow and protocol detectors. These inspect traffic as it is captured and fire on the properties of a connection or a protocol exchange |
| apt-scanner | Durable policy, correlation and campaign detectors. These run over stored data and identify behaviour that only becomes visible across many events or over a longer period |
| ML | Machine-learning anomaly and baseline models. These learn what is normal for the monitored network and flag departures from it |
A detection that cannot be expressed as a single suspicious packet - a slow campaign, a host quietly changing behaviour - is precisely what the apt-scanner and ML engines exist to catch, which is why all three are needed rather than one.
Browsing and filtering
You can narrow the list with the controls above the table:
- Search - matches on detector name, technique, or ATT&CK reference.
- Engine - restricts the list to one engine.
- Stage - restricts to a MITRE ATT&CK stage, such as Initial Access, Command and Control or Lateral Movement.
- Mode - restricts by mode: Active, Off, Advisory or Unknown.
- Status - restricts by configuration status, for example Active but not configured, Policy configured, Feed-driven, Model-driven or No setup needed.
- Group by engine - toggles between one flat list and separate sections per engine.
The line under the filters shows how many detectors match (for example Showing 175 of 175 detectors), followed by Clear filters when any filter is set. The search and filter values, and the selected tab, are kept in the page address, so a filtered view can be bookmarked or shared. If nothing matches, the page shows No detectors match these filters with a Clear filters button.
Reading the table
Within each list, detectors are grouped under their ATT&CK stage (for example Collection or Command and Control), with the number of detectors in each stage beside its name.
| Detector | The detector name, with its MITRE ATT&CK technique identifiers beneath it (for example T1071.003) |
| Engine | Which of the three engines implements it |
| Mode | Whether the detector is Active or Off |
| Severity | The severity assigned to alerts this detector raises |
| Configured? | Not configured when the detector is on but missing the policy it needs; a dash when there is nothing for you to do |
Click a column header to sort by that column; click it again to reverse the order. On narrower windows, where the column headers are hidden, use the Sort list instead. While a sort is applied, grouping by stage is paused and the result line shows the sort with a Clear sort button that returns to the default order.
Detector details
Click a row to open the detector’s details panel on the right. The panel shows the detector’s engine, name, internal identifier, and its mode, severity and configuration status, followed by:
- Detector controls - for apt-scanner detectors, an Active / Off switch and the Coverage gate slider. The coverage gate is a data-completeness guard: the detector stays silent unless at least this share of the fields it needs is present, so it does not fire on a partial picture.
- Inherited from Global - the shared policies this detector takes from Global Settings tab. An override set here applies to this detector only.
- Detector thresholds - the detector’s numeric thresholds. A value you set writes an override for this detector only; clearing it returns to the built-in default.
- Required policy - the lists the detector compares against (for example Approved sources). Lists that are still empty are marked Empty, and you can add entries directly here.
- What it detects, Why it matters, When it fires, ATT&CK context and Tuning - plain-language guidance on the detector and what to do when it fires.
Some detectors show a settings card in place of the policy lists:
- Volume, scan and historical-scoring apt-scanner detectors show their alert Severity (0–10), ML score (0–100), Impact, Lookback window (days) and Threshold, where they apply.
- Sigma Rule Match shows the Sigma engine settings card: the Engine switch (off by default), the Lookback window each pass scans (5–1440 minutes, default 60) and the Max candidates per rule (100–10000 events, default 2000). The rules themselves are managed on the Sigma Rules page.
- DataSense detectors with tunable parameters show them in a card, for example the attack duration and threshold. The card’s own Save writes the change.
Feed-driven detectors, the remaining DataSense detectors and ML models are configured on their own pages; for these the panel explains where and offers Open configuration, which opens that page. For apt-scanner detectors, Edit all advanced thresholds opens the full APT settings page.
Changes in the panel are not applied until you click Save changes. Reset discards them. The panel’s address can be shared: the detector is added to the page address, so the link opens the catalogue with that detector’s details already displayed.
Turning detectors on or off in bulk
apt-scanner detectors that have an on/off switch can be turned on or off together. Select them with the check box at the start of each row, with the check box in a list’s header, or with Select all eligible, which selects every eligible detector the current filters show. DataSense, ML and feed-driven detectors are saved through their own settings, and apt-scanner rows without a switch (the APT campaign rules, Sigma rule matches, the volume and Slow Network Scan thresholds) are tuned from their own detail panel; their check box is disabled, and hovering it says why.
When at least one detector is selected, a bar shows how many are selected, how they split by severity and between active and off, and how many of them are hidden by the current filters (Deselect removes those). Click Turn on or Turn off to change the selected detectors; you are asked to confirm before anything is saved. Clear empties the selection.
Row selection needs a window at least 1400 pixels wide.
Mode and Configured? are different things
These two columns are easy to confuse, and the distinction matters.
Mode is whether the detector is switched on. Configured? is whether it has the information it needs to do its job. A detector can be Active but not configured, which means it is enabled and consuming traffic but can never raise an alert, because the policy or asset list it compares against is empty.
For example, a detector that reports use of an unapproved DNS resolver cannot do so until the list of approved resolvers has been supplied - until then it has nothing to compare against. Detectors marked No policy required work immediately and need no further input.
This is why Needs attention is worth reviewing after installation: those detectors look enabled on the catalogue but contribute nothing until their supporting configuration exists. The Guided Setup tab walks through supplying exactly that information.
Global Settings tab
The third tab of the detection hub, Global Settings (page title Global Detection Settings),
holds the shared policy that apt-scanner detectors inherit, so a value is set once instead of per
detector. Open it from the tab bar, from the inherited-policy link in a detector’s details panel,
or directly at /administration/detection_catalog?tab=global.
The policy is organised in cards:
| Business hours | Approved working-hours windows as 24-hour HH:MM-HH:MM ranges (for example 07:00-19:00). Add several ranges for split shifts. Activity outside these windows is treated as after-hours |
| Admin / auth service ports | The login and remote-administration service ports for your environment (SSH, RDP, SMB, WinRM and similar), as whole numbers 1–65535. The list is saved to both the admin and the authentication port policies |
| High-risk upstream alerts | Which upstream alert types count as high-risk when corroborating an escalation. Left empty, the apt-scanner worker uses its own built-in set; choosing any alert type replaces that set entirely |
| Sanctioned / high-risk countries | Two-letter ISO country codes (for example KP, IR), with Apply to egress destinations and Apply to inbound sources switches that decide which direction the list is enforced on |
| TLS trust & certificate policy | Known-good issuers, common names, certificate domains and SNI/certificate pairs; free-issuer substrings; certificate expiry warning horizons (days); and the minimum TLS version |
| Analysis-window defaults | The current window (minutes) a detector compares against its baseline, and the minimum transfer size below which first-seen detectors ignore a flow |
Each card shows Inherited by with the number of detectors that read it; expand it to see which detectors these are, including any that override the value or are switched off. A detector uses the global value unless an override is set in its details panel. Clearing a global field is safe: the apt-scanner worker still applies its own built-in default for anything left empty.
When no global policy has been saved yet, the cards marked Recommended are pre-filled with a baseline and the footer reads Recommended defaults - not applied yet. Nothing is saved until you click Apply recommended defaults, or Save global settings once you have edited a card. When the policy is written for the first time, or while some cards still hold recommended values you have not opened, a confirmation states how many detectors inherit the values before anything is saved. Discard changes drops unsaved edits, and switching to another tab with unsaved changes asks you to confirm before they are discarded. NETALERT does not pre-fill a country list.